Difference between revisions of "Translations:Pixelmon launcher/3/en"
From Pixelmon Wiki
(Importando nueva versión desde fuente externa) |
(Importing a new version from external source) |
||
| Line 1: | Line 1: | ||
| − | The Pixelmon launcher is currently only compatible with Windows systems. It will not function on | + | The Pixelmon launcher is currently only compatible with Windows systems. It will not function on macOS or Linux; on these operating systems, the regular ''Minecraft'' launcher can still be used to [[install]] and use Pixelmon. |
==Installation and Setup== | ==Installation and Setup== | ||
__TOC__ | __TOC__ | ||
Revision as of 21:47, 13 July 2017
The Pixelmon launcher is currently only compatible with Windows systems. It will not function on macOS or Linux; on these operating systems, the regular Minecraft launcher can still be used to install and use Pixelmon.
Installation and Setup
- Download the Pixelmon launcher here.
- Once the download is completed, run the downloaded executable file to install the Pixelmon launcher.
- Accept the terms and conditions and specify where the Pixelmon launcher should be installed.
- When the installation finishes, the Pixelmon launcher will start automatically. A shortcut will be placed on the desktop for future use.
- Enter in your Minecraft account details to log into your account.
- To complete this step, you need to own a purchased copy of the computer version of Minecraft. You cannot use the Pixelmon launcher if you use a cracked version of Minecraft, or if you only own Minecraft Pocket Edition (including Windows 10 Edition) or console editions (Xbox, PlayStation, Wii U).
- If you are using the launcher to run a Pixpack, click here. Otherwise, continue below.
- Click the "Create New Profile" button in the green box. This will cause the profile editor interface to appear.
- Choose the desired Pixelmon and Forge versions
- Name the new profile if desired.
- If you want to use any additional mods alongside Pixelmon, click the "Add Official Sidemods" button for Pixelmon sidemods and/or the "Browse for Mods" button for other mods on your system.
- Save your profile once you are finished creating it.
- Click the download icon in the top-right area of the launcher to install Minecraft, Pixelmon, and Forge into the Pixelmon launcher. This may take a few minutes.
- Once the downloading is finished, the download icon will be replaced with a play icon. Pressing this button will launch Minecraft.
Troubleshooting
- If the Pixelmon launcher crashes during the installation process, see Crash Reading 101/Pixelmon launcher for possible solutions. If you cannot find a solution on that page, post a support ticket on the Pixelmon forums.
- If you are unable to launch Minecraft because you cannot allocate enough memory to Pixelmon, see Fixing memory issues.
Settings
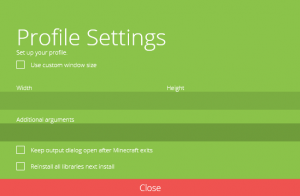
Profile settings
These settings can be found in the profile editor screen.
- Use custom window size: This allows a window size (width and height) to be defined exactly; it is an alternative to dragging the lower-right corner to resize the window.
- Additional arguments to use when initializing Minecraft.
- Keep output dialog open after Minecraft exits: This specifies whether the Minecraft console will persist after Minecraft closes.
- Reinstall all libraries next install: This will force all files to be re-downloaded the next time the profile is used.

 NodeCraft


