
 NodeCraft
Difference between revisions of "Pixelmon launcher"
| Line 6: | Line 6: | ||
==Installation and Setup== | ==Installation and Setup== | ||
#Download the Pixelmon launcher and the Pixelmon mod [http://pixelmonmod.com/downloads.php here]. If you already have a version of Pixelmon, you can use the existing jar instead and just download the Pixelmon launcher. | #Download the Pixelmon launcher and the Pixelmon mod [http://pixelmonmod.com/downloads.php here]. If you already have a version of Pixelmon, you can use the existing jar instead and just download the Pixelmon launcher. | ||
| − | #Download the Forge | + | #Download the recommended version of Forge installer for the Pixelmon version you are using [http://files.minecraftforge.net/ here]; newer versions of Forge than the recommended version will not be accepted by the launcher. |
#Once the download is completed, run the downloaded "LauncherSetup.msi" file to install the Pixelmon launcher. | #Once the download is completed, run the downloaded "LauncherSetup.msi" file to install the Pixelmon launcher. | ||
#Run the Pixelmon launcher, either directly after finishing installation or by navigating to the folder that the launcher was installed in (Program Files/Pixelmon Launcher by default). | #Run the Pixelmon launcher, either directly after finishing installation or by navigating to the folder that the launcher was installed in (Program Files/Pixelmon Launcher by default). | ||
Revision as of 23:53, 14 March 2015
The Pixelmon launcher is an optional alternative Minecraft launcher that can be used to install and run Pixelmon. Additional mods can be installed along with Pixelmon as well, either manually or through the use of custom modpacks known as "Pixpacks". It was primarily designed to simplify and legalize the distribution and installation of Pixelmon modpacks.
The Pixelmon launcher is currently only compatible with Windows systems. It will not function on Unix-based systems like Mac or Linux.
Installation and Setup
- Download the Pixelmon launcher and the Pixelmon mod here. If you already have a version of Pixelmon, you can use the existing jar instead and just download the Pixelmon launcher.
- Download the recommended version of Forge installer for the Pixelmon version you are using here; newer versions of Forge than the recommended version will not be accepted by the launcher.
- Once the download is completed, run the downloaded "LauncherSetup.msi" file to install the Pixelmon launcher.
- Run the Pixelmon launcher, either directly after finishing installation or by navigating to the folder that the launcher was installed in (Program Files/Pixelmon Launcher by default).
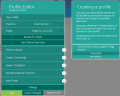
- Enter in your Minecraft account details to log into your account.
- If you are using the launcher to run a Pixpack, click here. Otherwise, continue below.
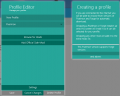
- Click the "Create New Profile" button in the green box. This will cause the profile editor interface to appear.
- Drag and drop the Pixelmon jar and Forge installer from your file system into the respective boxes.
- Name the new profile if desired.
- If you want to use any additional mods alongside Pixelmon, drag and drop them into the area that says "Drag and drop other mods here!"
- Save your profile once you are finished creating it.
- Click the download icon in the top-right area of the launcher to install Minecraft and Forge into the Pixelmon launcher. This may take a few minutes.
- Once the downloading is finished, the download icon will be replaced with a play icon. Pressing this button will launch Minecraft.
Making a new profile
Editing an existing profile


Pixpacks
Pixpacks are packages that can be used to make profiles in Pixelmon launcher. Within them, it is possible to bundle:
- A specific Pixelmon version
- Additional mods
- Config files (for both Pixelmon and the additional mods
- Resource packs and shaders
- World saves
- Server IPs
- A custom Pixelmon database
If a mod contained in the Pixpack doesn't allow distribution through external means, it is possible to instead link players to the mod's own download page.
Creating a Pixpack
- To begin making a new Pixpack, create an empty folder (location is irrelevant).
- Using a text editor such as Notepad, create a file named "setup.json" inside the new empty folder. This file is used to define several aspects of the Pixpack, including its name and the mods to be included inside it. An example setup.json file is shown below:
{
 "Name":"Example Pack",
 "URL":"http://www.pixelmonmod.com",
 "requirements":{
   "pixelmon":"3.4.0":[
     {
       "name":"OptiFine_1.7.10_HD_U_A4.jar",
       "bundled":false,
       "downloadURL":"http://optifine.net/downloads.php"
     },
     {
       "name":"pixelmonextras-universal-1.7.10-1.0.5.jar",
       "bundled":true,
     }
   ]
 },
"resourcePacks":[{
   "name":"Pixelmon Dark v0.6.zip",
   "activated":true
 }],
 "servers":[
 {
   "IP":"128.0.0.1",
   "Name":"Example Server"
 }]
}

- Depending on what you want to include inside the Pixpack, place any of the following items inside the folder:
- Mods that are bundled with the Pixpack (including the Forge installer)
- In a "config" folder, modified config files for any included mods (including pixelmon.cfg)
- In a "customdatabase" folder, a modified Pixelmon database (Pixelmon.h2.db)
- In a "resourcepacks" folder, any resource packs bundled with the Pixpack
- In a "saves" folder, world saves that will be available when using the Pixpack
- In a "shaderpacks" folder, shaders to be used with the Pixpack
- A "banner.png" file, which changes the banner at the top of the Pixelmon launcher. The default banner image can be found here.
- A "style.xaml" file, a text file that defines the color schemes used by various parts of the Pixelmon launcher. The default style.xaml file is shown below:
<ResourceDictionary xmlns="http://schemas.microsoft.com/winfx/2006/xaml/presentation" xmlns:x="http://schemas.microsoft.com/winfx/2006/xaml">
   <Color x:Key="MainColour">#00000000</Color>
   <Color x:Key="DarkerColour">#33000000</Color>
   <Color x:Key="DarkestColour">#55000000</Color>
   <Color x:Key="MenuBGColour">#FF29B6F6</Color>
   <Color x:Key="LoginBGColour">#FF8BC34A</Color>
   <Color x:Key="ProfileRegionBGColour">#FF8BC34A</Color>
   <Color x:Key="ProfileRegionBGDarkColour">#FF6F9C3B</Color>
   <Color x:Key="ProfileRegionBGDarkerColour">#FF4F782C</Color>
   <Color x:Key="MainFontColour">White</Color>
   <Color x:Key="AltFontColour">Black</Color>
   <Color x:Key="RadioButtonPressed">#FF8BC34A</Color>
   <Color x:Key="PopupBGColour">#FF26A69A</Color>
   <Color x:Key="PopupBGDarkColour">#FF00897B</Color>
   <Color x:Key="PlayButtonInnerColor">#FF8BC34A</Color>
   <Color x:Key="PlayButtonOuterColor">White</Color>
   <Color x:Key="DeleteButtonBGColour">#FFEF5350</Color>
   <Color x:Key="SaveButtonBGColour">#FF00695C</Color>
</ResourceDictionary>
- After adding the files you want in the pack, highlight all of the files and compress them into a compressed (zipped) folder.
- Rename the zipped folder to the name you want for your Pixpack. Add the ".pixpack" extension after the file name.
Running a Pixpack

- Select the .pixpack file from Windows Explorer/File Explorer and open it with the Pixelmon launcher.
- If the Pixpack requires you to download mods via the mods' websites, follow the links provided and download them. Drag and drop the required mod files into the launcher.
- Click the "Install Profile" button.
- Click the button with the download icon at the top-right area of the launcher and wait for installation to finish.
- Run the pack directly from the box.
- In subsequent sessions, press the play button at the top-right area of the launcher, where the download icon previously was.