
 NodeCraft
Difference between revisions of "Arc Chalice"
Blacephalon (talk | contribs) |
m (→Village Ruins: Added images) |
||
| (13 intermediate revisions by 6 users not shown) | |||
| Line 1: | Line 1: | ||
| − | The Arc Chalice is found in a special structure that can rarely generate in [[ | + | The Arc Chalice is found in a special structure that can rarely generate in [[Extreme Hills (Forge)]] biomes in the ruined villages and in [[Ocean (Forge)]] biomes in the ocean temple. It is used to obtain the [[Azure Flute]], which is used in obtaining "The Original One", [[Arceus]]. The Arc Chalice is shaped much like a goblet, with a white texture and golden bands resembling the model of Arceus. |
==Biomes== | ==Biomes== | ||
| − | *[[File: | + | *[[File:Grid_Arc_Chalice.png]][[Arc Chalice]]: [[Extreme Hills (Forge)]], [[Ocean (Forge)]] |
==Requirements== | ==Requirements== | ||
| − | In order for the Arc Chalice to be utilized, the player must first obtain a [[Plate]] for each Pokémon typing, | + | In order for the Arc Chalice to be utilized, the player must first obtain a [[Plate]] for each Pokémon typing, 18 in total. After each plate has been obtained, the player may right click the Chalice with one of each plate, which will result in a special particle effect activating and a message in chat indicating the number of remaining plates needed. After each plate is added to the chalice, the floating orbs will begin to spin and move toward the middle of the chalice. Once this is done, there will be an explosion sound and a glowing [[Azure Flute]] will appear atop the Arc Chalice. |
| + | |||
| + | ==Loot== | ||
| + | Each Land Chalice village chest contains items drawn from 6 pools (one per category), with the following distribution: | ||
| + | {|class="wikitable sortable" | ||
| + | ! rowspan="2" | Category | ||
| + | ! rowspan="2" | Item | ||
| + | ! class="unsortable" colspan="4" |{{tt|Stack size|The size of stacks (or for unstackable items, number) of this item in any given roll.}} | ||
| + | ! class="unsortable" colspan="4" |{{tt|Weight|The weight of this item relative to other items in the pool.}} | ||
| + | ! rowspan="2" |{{tt|Chance|The odds of finding any of this itemin a single chest.}} | ||
| + | ! rowspan="2" |{{tt|Avg.{{-}}per chest|The number of items expected per chest, averaged over a large number of chests.}} | ||
| + | |- | ||
| + | !{{tt|1x|The chest draws 1 stack(s) randomly from this pool.}} | ||
| + | !{{tt|2x|The chest draws 2 stack(s) randomly from this pool.}} | ||
| + | !{{tt|1-2x|The chest draws 1–2 stack(s) randomly from this pool.}} | ||
| + | !{{tt|3-5x|The chest draws 3–5 stack(s) randomly from this pool.}} | ||
| + | |- | ||
| + | |style="text-align:center"|Artifacts | ||
| + | |{{i|Adamant Crystal}} | ||
| + | |style="text-align:center"|1 | ||
| + | |style="text-align:center"|— | ||
| + | |style="text-align:center"|— | ||
| + | |style="text-align:center"|— | ||
| + | |style="text-align:center"|{{frac|1|33}} | ||
| + | |style="text-align:center"|— | ||
| + | |style="text-align:center"|— | ||
| + | |style="text-align:center"|— | ||
| + | |style="text-align:center"|{{percent|3.0|100}} | ||
| + | |style="text-align:center"|0.030 | ||
| + | |- | ||
| + | |style="text-align:center"|Artifacts | ||
| + | |{{i|Lustrous Globe}} | ||
| + | |style="text-align:center"|1 | ||
| + | |style="text-align:center"|— | ||
| + | |style="text-align:center"|— | ||
| + | |style="text-align:center"|— | ||
| + | |style="text-align:center"|{{frac|1|33}} | ||
| + | |style="text-align:center"|— | ||
| + | |style="text-align:center"|— | ||
| + | |style="text-align:center"|— | ||
| + | |style="text-align:center"|{{percent|3.0|100}} | ||
| + | |style="text-align:center"|0.030 | ||
| + | |- | ||
| + | |style="text-align:center"|Artifacts | ||
| + | |{{i|Griseous Core}} | ||
| + | |style="text-align:center"|1 | ||
| + | |style="text-align:center"|— | ||
| + | |style="text-align:center"|— | ||
| + | |style="text-align:center"|— | ||
| + | |style="text-align:center"|{{frac|1|33}} | ||
| + | |style="text-align:center"|— | ||
| + | |style="text-align:center"|— | ||
| + | |style="text-align:center"|— | ||
| + | |style="text-align:center"|{{percent|3.0|100}} | ||
| + | |style="text-align:center"|0.030 | ||
| + | |- | ||
| + | |style="text-align:center"|Held Items | ||
| + | |{{i|Spell Tag}} | ||
| + | |style="text-align:center"|1 | ||
| + | |style="text-align:center"|— | ||
| + | |style="text-align:center"|— | ||
| + | |style="text-align:center"|— | ||
| + | |style="text-align:center"|{{frac|1|13}} | ||
| + | |style="text-align:center"|— | ||
| + | |style="text-align:center"|— | ||
| + | |style="text-align:center"|— | ||
| + | |style="text-align:center"|{{percent|7.7|100}} | ||
| + | |style="text-align:center"|0.077 | ||
| + | |- | ||
| + | |style="text-align:center"|Held Items | ||
| + | |{{i|Metal Coat}} | ||
| + | |style="text-align:center"|1 | ||
| + | |style="text-align:center"|— | ||
| + | |style="text-align:center"|— | ||
| + | |style="text-align:center"|— | ||
| + | |style="text-align:center"|{{frac|1|13}} | ||
| + | |style="text-align:center"|— | ||
| + | |style="text-align:center"|— | ||
| + | |style="text-align:center"|— | ||
| + | |style="text-align:center"|{{percent|7.7|100}} | ||
| + | |style="text-align:center"|0.077 | ||
| + | |- | ||
| + | |style="text-align:center"|Held Items | ||
| + | |{{i|Mystic Water}} | ||
| + | |style="text-align:center"|1 | ||
| + | |style="text-align:center"|— | ||
| + | |style="text-align:center"|— | ||
| + | |style="text-align:center"|— | ||
| + | |style="text-align:center"|{{frac|1|13}} | ||
| + | |style="text-align:center"|— | ||
| + | |style="text-align:center"|— | ||
| + | |style="text-align:center"|— | ||
| + | |style="text-align:center"|{{percent|7.7|100}} | ||
| + | |style="text-align:center"|0.077 | ||
| + | |- | ||
| + | |style="text-align:center"|Treasure | ||
| + | |{{i|Relic Copper}} | ||
| + | |style="text-align:center"|— | ||
| + | |style="text-align:center"|1 | ||
| + | |style="text-align:center"|— | ||
| + | |style="text-align:center"|— | ||
| + | |style="text-align:center"|— | ||
| + | |style="text-align:center"|{{frac|10|29}} | ||
| + | |style="text-align:center"|— | ||
| + | |style="text-align:center"|— | ||
| + | |style="text-align:center"|{{percent|57.1|100}} | ||
| + | |style="text-align:center"|0.690 | ||
| + | |- | ||
| + | |style="text-align:center"|Treasure | ||
| + | |{{i|Relic Silver}} | ||
| + | |style="text-align:center"|— | ||
| + | |style="text-align:center"|1 | ||
| + | |style="text-align:center"|— | ||
| + | |style="text-align:center"|— | ||
| + | |style="text-align:center"|— | ||
| + | |style="text-align:center"|{{frac|5|29}} | ||
| + | |style="text-align:center"|— | ||
| + | |style="text-align:center"|— | ||
| + | |style="text-align:center"|{{percent|31.5|100}} | ||
| + | |style="text-align:center"|0.345 | ||
| + | |- | ||
| + | |style="text-align:center"|Treasure | ||
| + | |{{i|Relic Gold}} | ||
| + | |style="text-align:center"|— | ||
| + | |style="text-align:center"|1 | ||
| + | |style="text-align:center"|— | ||
| + | |style="text-align:center"|— | ||
| + | |style="text-align:center"|— | ||
| + | |style="text-align:center"|{{frac|1|29}} | ||
| + | |style="text-align:center"|— | ||
| + | |style="text-align:center"|— | ||
| + | |style="text-align:center"|{{percent|6.8|100}} | ||
| + | |style="text-align:center"|0.069 | ||
| + | |- | ||
| + | |style="text-align:center"|Treasure | ||
| + | |{{i|Nugget}} | ||
| + | |style="text-align:center"|— | ||
| + | |style="text-align:center"|1 | ||
| + | |style="text-align:center"|— | ||
| + | |style="text-align:center"|— | ||
| + | |style="text-align:center"|— | ||
| + | |style="text-align:center"|{{frac|3|29}} | ||
| + | |style="text-align:center"|— | ||
| + | |style="text-align:center"|— | ||
| + | |style="text-align:center"|{{percent|19.6|100}} | ||
| + | |style="text-align:center"|0.207 | ||
| + | |- | ||
| + | |style="text-align:center"|Armor | ||
| + | |{{i|Plasma Chestplate}} | ||
| + | |style="text-align:center"|— | ||
| + | |style="text-align:center"|1 | ||
| + | |style="text-align:center"|— | ||
| + | |style="text-align:center"|— | ||
| + | |style="text-align:center"|— | ||
| + | |style="text-align:center"|{{frac|3|22}} | ||
| + | |style="text-align:center"|— | ||
| + | |style="text-align:center"|— | ||
| + | |style="text-align:center"|{{percent|25.4|100}} | ||
| + | |style="text-align:center"|0.273 | ||
| + | |- | ||
| + | |style="text-align:center"|Armor | ||
| + | |{{i|Plasma Leggings}} | ||
| + | |style="text-align:center"|— | ||
| + | |style="text-align:center"|1 | ||
| + | |style="text-align:center"|— | ||
| + | |style="text-align:center"|— | ||
| + | |style="text-align:center"|— | ||
| + | |style="text-align:center"|{{frac|3|22}} | ||
| + | |style="text-align:center"|— | ||
| + | |style="text-align:center"|— | ||
| + | |style="text-align:center"|{{percent|25.4|100}} | ||
| + | |style="text-align:center"|0.273 | ||
| + | |- | ||
| + | |style="text-align:center"|Armor | ||
| + | |{{i|Plasma Helmet}} | ||
| + | |style="text-align:center"|— | ||
| + | |style="text-align:center"|1 | ||
| + | |style="text-align:center"|— | ||
| + | |style="text-align:center"|— | ||
| + | |style="text-align:center"|— | ||
| + | |style="text-align:center"|{{frac|3|22}} | ||
| + | |style="text-align:center"|— | ||
| + | |style="text-align:center"|— | ||
| + | |style="text-align:center"|{{percent|25.4|100}} | ||
| + | |style="text-align:center"|0.273 | ||
| + | |- | ||
| + | |style="text-align:center"|Armor | ||
| + | |{{i|Plasma Boots}} | ||
| + | |style="text-align:center"|— | ||
| + | |style="text-align:center"|1 | ||
| + | |style="text-align:center"|— | ||
| + | |style="text-align:center"|— | ||
| + | |style="text-align:center"|— | ||
| + | |style="text-align:center"|{{frac|3|22}} | ||
| + | |style="text-align:center"|— | ||
| + | |style="text-align:center"|— | ||
| + | |style="text-align:center"|{{percent|25.4|100}} | ||
| + | |style="text-align:center"|0.273 | ||
| + | |- | ||
| + | |style="text-align:center"|Gems | ||
| + | |{{i|Ghost Gem}} | ||
| + | |style="text-align:center"|— | ||
| + | |style="text-align:center"|— | ||
| + | |style="text-align:center"|1–3 | ||
| + | |style="text-align:center"|— | ||
| + | |style="text-align:center"|— | ||
| + | |style="text-align:center"|— | ||
| + | |style="text-align:center"|{{frac|5|30}} | ||
| + | |style="text-align:center"|— | ||
| + | |style="text-align:center"|{{percent|23.6|100}} | ||
| + | |style="text-align:center"|0.500 | ||
| + | |- | ||
| + | |style="text-align:center"|Gems | ||
| + | |{{i|Steel Gem}} | ||
| + | |style="text-align:center"|— | ||
| + | |style="text-align:center"|— | ||
| + | |style="text-align:center"|1–3 | ||
| + | |style="text-align:center"|— | ||
| + | |style="text-align:center"|— | ||
| + | |style="text-align:center"|— | ||
| + | |style="text-align:center"|{{frac|5|30}} | ||
| + | |style="text-align:center"|— | ||
| + | |style="text-align:center"|{{percent|23.6|100}} | ||
| + | |style="text-align:center"|0.500 | ||
| + | |- | ||
| + | |style="text-align:center"|Gems | ||
| + | |{{i|Water Gem}} | ||
| + | |style="text-align:center"|— | ||
| + | |style="text-align:center"|— | ||
| + | |style="text-align:center"|1–3 | ||
| + | |style="text-align:center"|— | ||
| + | |style="text-align:center"|— | ||
| + | |style="text-align:center"|— | ||
| + | |style="text-align:center"|{{frac|5|30}} | ||
| + | |style="text-align:center"|— | ||
| + | |style="text-align:center"|{{percent|23.6|100}} | ||
| + | |style="text-align:center"|0.500 | ||
| + | |- | ||
| + | |style="text-align:center"|Vanilla | ||
| + | |{{i|Beetroot}} | ||
| + | |style="text-align:center"|— | ||
| + | |style="text-align:center"|— | ||
| + | |style="text-align:center"|— | ||
| + | |style="text-align:center"|1–10 | ||
| + | |style="text-align:center"|— | ||
| + | |style="text-align:center"|— | ||
| + | |style="text-align:center"|— | ||
| + | |style="text-align:center"|{{frac|10|45}} | ||
| + | |style="text-align:center"|{{percent|62.6|100}} | ||
| + | |style="text-align:center"|4.889 | ||
| + | |- | ||
| + | |style="text-align:center"|Vanilla | ||
| + | |{{i|Pumpkin Pie|mc=Pumpkin_Pie}} | ||
| + | |style="text-align:center"|— | ||
| + | |style="text-align:center"|— | ||
| + | |style="text-align:center"|— | ||
| + | |style="text-align:center"|1–5 | ||
| + | |style="text-align:center"|— | ||
| + | |style="text-align:center"|— | ||
| + | |style="text-align:center"|— | ||
| + | |style="text-align:center"|{{frac|3|45}} | ||
| + | |style="text-align:center"|{{percent|24.0|100}} | ||
| + | |style="text-align:center"|0.800 | ||
| + | |- | ||
| + | |style="text-align:center"|Vanilla | ||
| + | |{{i|Bread}} | ||
| + | |style="text-align:center"|— | ||
| + | |style="text-align:center"|— | ||
| + | |style="text-align:center"|— | ||
| + | |style="text-align:center"|1–5 | ||
| + | |style="text-align:center"|— | ||
| + | |style="text-align:center"|— | ||
| + | |style="text-align:center"|— | ||
| + | |style="text-align:center"|{{frac|7|45}} | ||
| + | |style="text-align:center"|{{percent|48.7|100}} | ||
| + | |style="text-align:center"|1.867 | ||
| + | |- | ||
| + | |style="text-align:center"|Vanilla | ||
| + | |{{i|Gunpowder}} | ||
| + | |style="text-align:center"|— | ||
| + | |style="text-align:center"|— | ||
| + | |style="text-align:center"|— | ||
| + | |style="text-align:center"|1–10 | ||
| + | |style="text-align:center"|— | ||
| + | |style="text-align:center"|— | ||
| + | |style="text-align:center"|— | ||
| + | |style="text-align:center"|{{frac|5|45}} | ||
| + | |style="text-align:center"|{{percent|37.3|100}} | ||
| + | |style="text-align:center"|2.444 | ||
| + | |- | ||
| + | |style="text-align:center"|Vanilla | ||
| + | |{{i|Tripwire Hook|mc=Tripwire_Hook}} | ||
| + | |style="text-align:center"|— | ||
| + | |style="text-align:center"|— | ||
| + | |style="text-align:center"|— | ||
| + | |style="text-align:center"|1–3 | ||
| + | |style="text-align:center"|— | ||
| + | |style="text-align:center"|— | ||
| + | |style="text-align:center"|— | ||
| + | |style="text-align:center"|{{frac|3|45}} | ||
| + | |style="text-align:center"|{{percent|24.0|100}} | ||
| + | |style="text-align:center"|0.533 | ||
| + | |- | ||
| + | |style="text-align:center"|Vanilla | ||
| + | |{{i|Charcoal|image=Minecraft_Charcoal}} | ||
| + | |style="text-align:center"|— | ||
| + | |style="text-align:center"|— | ||
| + | |style="text-align:center"|— | ||
| + | |style="text-align:center"|1–5 | ||
| + | |style="text-align:center"|— | ||
| + | |style="text-align:center"|— | ||
| + | |style="text-align:center"|— | ||
| + | |style="text-align:center"|{{frac|7|45}} | ||
| + | |style="text-align:center"|{{percent|48.7|100}} | ||
| + | |style="text-align:center"|1.867 | ||
| + | |- | ||
| + | |style="text-align:center"|Vanilla | ||
| + | |{{i|Ruby}} | ||
| + | |style="text-align:center"|— | ||
| + | |style="text-align:center"|— | ||
| + | |style="text-align:center"|— | ||
| + | |style="text-align:center"|1–3 | ||
| + | |style="text-align:center"|— | ||
| + | |style="text-align:center"|— | ||
| + | |style="text-align:center"|— | ||
| + | |style="text-align:center"|{{frac|5|45}} | ||
| + | |style="text-align:center"|{{percent|37.3|100}} | ||
| + | |style="text-align:center"|0.889 | ||
| + | |- | ||
| + | |style="text-align:center"|Vanilla | ||
| + | |{{i|Silicon}} | ||
| + | |style="text-align:center"|— | ||
| + | |style="text-align:center"|— | ||
| + | |style="text-align:center"|— | ||
| + | |style="text-align:center"|1–3 | ||
| + | |style="text-align:center"|— | ||
| + | |style="text-align:center"|— | ||
| + | |style="text-align:center"|— | ||
| + | |style="text-align:center"|{{frac|5|45}} | ||
| + | |style="text-align:center"|{{percent|37.3|100}} | ||
| + | |style="text-align:center"|0.889 | ||
| + | |} | ||
| + | |||
| + | ==Structure List== | ||
| + | ===Main Structure=== | ||
| + | {|class="mw-collapsible mw-collapsed wikitable" | ||
| + | !style="text-align:center" colspan="2"|Name | ||
| + | !style="text-align:center"|Info | ||
| + | !style="text-align:center"|Image | ||
| + | |- | ||
| + | |rowspan="2"|Water Chalice | ||
| + | |Intact | ||
| + | |{{tt|ID|Used in Template Pools and when loading a structure with Structure Blocks.}}: <code>pixelmon:shrines/chalice_shrine_a</code> | ||
| + | |||
| + | |||
| + | Builder: '''SKy_the_Thunder''' | ||
| + | |[[File:Chalice_Shrine_A.png|150px]] | ||
| + | |- | ||
| + | |Ruin | ||
| + | |{{tt|ID|Used in Template Pools and when loading a structure with Structure Blocks.}}: <code>pixelmon:shrines/chalice_shrine_ruins_a</code> | ||
| + | |||
| + | |||
| + | Builder: '''SKy_the_Thunder''' | ||
| + | |[[File:Chalice_shrine_ruins_a.png|150px]] | ||
| + | |- | ||
| + | |rowspan="2"|Land Chalice | ||
| + | |Intact | ||
| + | |{{tt|ID|Used in Template Pools and when loading a structure with Structure Blocks.}}: <code>pixelmon:shrines/chalice_shrine_b</code> | ||
| + | |||
| + | |||
| + | Builder: '''Konstadoulis''' | ||
| + | |[[File:Chalice_Shrine_B.png|150px]] | ||
| + | |- | ||
| + | |Ruin | ||
| + | |{{tt|ID|Used in Template Pools and when loading a structure with Structure Blocks.}}: <code>pixelmon:shrines/chalice_shrine_ruins_b</code> | ||
| + | |||
| + | |||
| + | Builder: '''Konstadoulis''' | ||
| + | |[[File:Chalice_shrine_ruins_b.png|150px]] | ||
| + | |} | ||
| + | |||
| + | ===Village Ruins=== | ||
| + | <big>At the Land Chalice</big> | ||
| + | {|class="mw-collapsible mw-collapsed wikitable" | ||
| + | !style="text-align:center" colspan="2"|Name | ||
| + | !style="text-align:center"|Info | ||
| + | !style="text-align:center"|Image | ||
| + | |- | ||
| + | |rowspan="8"|House | ||
| + | |Variant A | ||
| + | |{{tt|ID|Used in Template Pools and when loading a structure with Structure Blocks.}}: <code>pixelmon:shrines/chalice_shrine_house_a</code> | ||
| + | {{tt|Loot Tables|Determines which items can be found in containers like Chests/Barrels.}}: <code>pixelmon:chests/galactic</code> | ||
| + | |||
| + | Builder: '''Rasgnarok''' | ||
| + | |[[File:Chalice_Shrine_House_A.png|150px]] | ||
| + | |- | ||
| + | |Variant B | ||
| + | |{{tt|ID|Used in Template Pools and when loading a structure with Structure Blocks.}}: <code>pixelmon:shrines/chalice_shrine_house_b</code> | ||
| + | |||
| + | |||
| + | Builder: '''Rasgnarok''' | ||
| + | |[[File:Chalice_Shrine_House_B.png|150px]] | ||
| + | |- | ||
| + | |Variant C | ||
| + | |{{tt|ID|Used in Template Pools and when loading a structure with Structure Blocks.}}: <code>pixelmon:shrines/chalice_shrine_house_c</code> | ||
| + | |||
| + | |||
| + | Builder: '''Rasgnarok''' | ||
| + | |[[File:Chalice_Shrine_House_C.png|150px]] | ||
| + | |- | ||
| + | |Variant D | ||
| + | |{{tt|ID|Used in Template Pools and when loading a structure with Structure Blocks.}}: <code>pixelmon:shrines/chalice_shrine_house_d</code> | ||
| + | {{tt|Loot Tables|Determines which items can be found in containers like Chests/Barrels.}}: <code>pixelmon:chests/galactic</code>, <code>pixelmon:chests/haunted_home</code> | ||
| + | |||
| + | Builder: '''Rasgnarok''' | ||
| + | |[[File:Chalice_Shrine_House_D.png|150px]] | ||
| + | |- | ||
| + | |Variant E | ||
| + | |{{tt|ID|Used in Template Pools and when loading a structure with Structure Blocks.}}: <code>pixelmon:shrines/chalice_shrine_house_e</code> | ||
| + | {{tt|Loot Tables|Determines which items can be found in containers like Chests/Barrels.}}: <code>pixelmon:chests/galactic</code> | ||
| + | |||
| + | Builder: '''Rasgnarok''' | ||
| + | |[[File:Chalice_Shrine_House_E.png|150px]] | ||
| + | |- | ||
| + | |Variant F | ||
| + | |{{tt|ID|Used in Template Pools and when loading a structure with Structure Blocks.}}: <code>pixelmon:shrines/chalice_shrine_house_f</code> | ||
| + | {{tt|Loot Tables|Determines which items can be found in containers like Chests/Barrels.}}: <code>pixelmon:chests/galactic</code> | ||
| + | |||
| + | Builder: '''Rasgnarok''' | ||
| + | |[[File:Chalice_Shrine_House_F.png|150px]] | ||
| + | |- | ||
| + | |Variant G | ||
| + | |{{tt|ID|Used in Template Pools and when loading a structure with Structure Blocks.}}: <code>pixelmon:shrines/chalice_shrine_house_g</code> | ||
| + | {{tt|Loot Tables|Determines which items can be found in containers like Chests/Barrels.}}: <code>pixelmon:chests/galactic</code> | ||
| + | |||
| + | Builder: '''Rasgnarok''' | ||
| + | |[[File:Chalice_Shrine_House_G.png|150px]] | ||
| + | |- | ||
| + | |Variant H | ||
| + | |{{tt|ID|Used in Template Pools and when loading a structure with Structure Blocks.}}: <code>pixelmon:shrines/chalice_shrine_house_h</code> | ||
| + | {{tt|Loot Tables|Determines which items can be found in containers like Chests/Barrels.}}: <code>pixelmon:chests/galactic</code>, <code>pixelmon:chests/haunted_home</code> | ||
| + | |||
| + | Builder: '''Rasgnarok''' | ||
| + | |[[File:Chalice_Shrine_House_H.png|150px]] | ||
| + | |- | ||
| + | |rowspan="3"|Path | ||
| + | |Variant A | ||
| + | |{{tt|ID|Used in Template Pools and when loading a structure with Structure Blocks.}}: <code>pixelmon:shrines/chalice_shrine_path_a</code> | ||
| + | |||
| + | |||
| + | Builder: '''SKy_the_Thunder''' | ||
| + | |[[File:Chalice_Shrine_Path_A.png|150px]] | ||
| + | |- | ||
| + | |Variant B | ||
| + | |{{tt|ID|Used in Template Pools and when loading a structure with Structure Blocks.}}: <code>pixelmon:shrines/chalice_shrine_path_b</code> | ||
| + | |||
| + | |||
| + | Builder: '''SKy_the_Thunder''' | ||
| + | |[[File:Chalice_Shrine_Path_B.png|150px]] | ||
| + | |- | ||
| + | |Variant C | ||
| + | |{{tt|ID|Used in Template Pools and when loading a structure with Structure Blocks.}}: <code>pixelmon:shrines/chalice_shrine_path_c</code> | ||
| + | |||
| + | |||
| + | Builder: '''SKy_the_Thunder''' | ||
| + | |[[File:Chalice_Shrine_Path_C.png|150px]] | ||
| + | |- | ||
| + | |rowspan="7"|Decoration | ||
| + | |Variant A | ||
| + | |{{tt|ID|Used in Template Pools and when loading a structure with Structure Blocks.}}: <code>pixelmon:shrines/chalice_shrine_deco_a</code> | ||
| + | |||
| + | |||
| + | Builder: '''SKy_the_Thunder''' | ||
| + | |style="text-align:center"|[[File:Chalice_Shrine_Deco_A.png|100px]] | ||
| + | |- | ||
| + | |Variant B | ||
| + | |{{tt|ID|Used in Template Pools and when loading a structure with Structure Blocks.}}: <code>pixelmon:shrines/chalice_shrine_deco_b</code> | ||
| + | |||
| + | |||
| + | Builder: '''Konstadoulis''' | ||
| + | |[[File:Chalice_Shrine_Deco_B.png|150px]] | ||
| + | |- | ||
| + | |Variant C | ||
| + | |{{tt|ID|Used in Template Pools and when loading a structure with Structure Blocks.}}: <code>pixelmon:shrines/chalice_shrine_deco_c</code> | ||
| + | |||
| + | |||
| + | Builder: '''Konstadoulis''' | ||
| + | |style="text-align:center"|[[File:Chalice_Shrine_Deco_C.png|70px]] | ||
| + | |- | ||
| + | |Variant D | ||
| + | |{{tt|ID|Used in Template Pools and when loading a structure with Structure Blocks.}}: <code>pixelmon:shrines/chalice_shrine_deco_d</code> | ||
| + | |||
| + | |||
| + | Builder: '''SKy_the_Thunder''' | ||
| + | |style="text-align:center"|[[File:Chalice_Shrine_Deco_D.png|70px]] | ||
| + | |- | ||
| + | |Variant E | ||
| + | |{{tt|ID|Used in Template Pools and when loading a structure with Structure Blocks.}}: <code>pixelmon:shrines/chalice_shrine_deco_e</code> | ||
| + | |||
| + | |||
| + | Builder: '''SKy_the_Thunder''' | ||
| + | |style="text-align:center"|[[File:Chalice_Shrine_Deco_E.png|70px]] | ||
| + | |- | ||
| + | |Variant F | ||
| + | |{{tt|ID|Used in Template Pools and when loading a structure with Structure Blocks.}}: <code>pixelmon:shrines/chalice_shrine_deco_f</code> | ||
| + | |||
| + | |||
| + | Builder: '''SKy_the_Thunder''' | ||
| + | |[[File:Chalice_Shrine_Deco_F.png|150px]] | ||
| + | |- | ||
| + | |Variant G | ||
| + | |{{tt|ID|Used in Template Pools and when loading a structure with Structure Blocks.}}: <code>pixelmon:shrines/chalice_shrine_deco_g</code> | ||
| + | |||
| + | |||
| + | Builder: '''ZodiacBullYT''' | ||
| + | |[[File:Chalice_Shrine_Deco_G.png|150px]] | ||
| + | |} | ||
==Gallery== | ==Gallery== | ||
| − | + | <gallery> | |
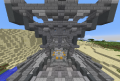
| + | Land_Chalice_village.png|A Land Chalice with village | ||
| + | Land_Chalice.png|Land Chalice building | ||
| + | Water_Chalice.png|Water Chalice | ||
| + | </gallery> | ||
==[[Config]] settings== | ==[[Config]] settings== | ||
*"spawnStructures": If disabled, the Arc Chalice structure(and all other Pixelmon structures) will not spawn naturally. | *"spawnStructures": If disabled, the Arc Chalice structure(and all other Pixelmon structures) will not spawn naturally. | ||
| + | |||
| + | ==Trivia== | ||
| + | <gallery> | ||
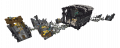
| + | Arc Chalice Struc.png|Arc Chalice up to version 8.4.2 | ||
| + | </gallery> | ||
[[Category:Items]] | [[Category:Items]] | ||
[[Category:Structures]] | [[Category:Structures]] | ||
Latest revision as of 14:06, 23 April 2024
The Arc Chalice is found in a special structure that can rarely generate in Extreme Hills (Forge) biomes in the ruined villages and in Ocean (Forge) biomes in the ocean temple. It is used to obtain the Azure Flute, which is used in obtaining "The Original One", Arceus. The Arc Chalice is shaped much like a goblet, with a white texture and golden bands resembling the model of Arceus.
Contents
Biomes
Requirements
In order for the Arc Chalice to be utilized, the player must first obtain a Plate for each Pokémon typing, 18 in total. After each plate has been obtained, the player may right click the Chalice with one of each plate, which will result in a special particle effect activating and a message in chat indicating the number of remaining plates needed. After each plate is added to the chalice, the floating orbs will begin to spin and move toward the middle of the chalice. Once this is done, there will be an explosion sound and a glowing Azure Flute will appear atop the Arc Chalice.
Loot
Each Land Chalice village chest contains items drawn from 6 pools (one per category), with the following distribution:
| Category | Item | Stack size | Weight | Chance | Avg. per chest | ||||||
|---|---|---|---|---|---|---|---|---|---|---|---|
| 1x | 2x | 1-2x | 3-5x | 1x | 2x | 1-2x | 3-5x | ||||
| Artifacts | 1 | — | — | — | 133 | — | — | — | 3% | 0.030 | |
| Artifacts | 1 | — | — | — | 133 | — | — | — | 3% | 0.030 | |
| Artifacts | 1 | — | — | — | 133 | — | — | — | 3% | 0.030 | |
| Held Items | 1 | — | — | — | 113 | — | — | — | 7.7% | 0.077 | |
| Held Items | 1 | — | — | — | 113 | — | — | — | 7.7% | 0.077 | |
| Held Items | 1 | — | — | — | 113 | — | — | — | 7.7% | 0.077 | |
| Treasure | — | 1 | — | — | — | 1029 | — | — | 57.1% | 0.690 | |
| Treasure | — | 1 | — | — | — | 529 | — | — | 31.5% | 0.345 | |
| Treasure | — | 1 | — | — | — | 129 | — | — | 6.8% | 0.069 | |
| Treasure | — | 1 | — | — | — | 329 | — | — | 19.6% | 0.207 | |
| Armor | — | 1 | — | — | — | 322 | — | — | 25.4% | 0.273 | |
| Armor | — | 1 | — | — | — | 322 | — | — | 25.4% | 0.273 | |
| Armor | — | 1 | — | — | — | 322 | — | — | 25.4% | 0.273 | |
| Armor | — | 1 | — | — | — | 322 | — | — | 25.4% | 0.273 | |
| Gems | — | — | 1–3 | — | — | — | 530 | — | 23.6% | 0.500 | |
| Gems | — | — | 1–3 | — | — | — | 530 | — | 23.6% | 0.500 | |
| Gems | — | — | 1–3 | — | — | — | 530 | — | 23.6% | 0.500 | |
| Vanilla | — | — | — | 1–10 | — | — | — | 1045 | 62.6% | 4.889 | |
| Vanilla | — | — | — | 1–5 | — | — | — | 345 | 24% | 0.800 | |
| Vanilla | — | — | — | 1–5 | — | — | — | 745 | 48.7% | 1.867 | |
| Vanilla | — | — | — | 1–10 | — | — | — | 545 | 37.3% | 2.444 | |
| Vanilla | — | — | — | 1–3 | — | — | — | 345 | 24% | 0.533 | |
| Vanilla | — | — | — | 1–5 | — | — | — | 745 | 48.7% | 1.867 | |
| Vanilla | — | — | — | 1–3 | — | — | — | 545 | 37.3% | 0.889 | |
| Vanilla | — | — | — | 1–3 | — | — | — | 545 | 37.3% | 0.889 | |
Structure List
Main Structure
| Name | Info | Image | |
|---|---|---|---|
| Water Chalice | Intact | ID: pixelmon:shrines/chalice_shrine_a
|

|
| Ruin | ID: pixelmon:shrines/chalice_shrine_ruins_a
|

| |
| Land Chalice | Intact | ID: pixelmon:shrines/chalice_shrine_b
|

|
| Ruin | ID: pixelmon:shrines/chalice_shrine_ruins_b
|

| |
Village Ruins
At the Land Chalice
| Name | Info | Image | |
|---|---|---|---|
| House | Variant A | ID: pixelmon:shrines/chalice_shrine_house_a
Loot Tables: Builder: Rasgnarok |

|
| Variant B | ID: pixelmon:shrines/chalice_shrine_house_b
|

| |
| Variant C | ID: pixelmon:shrines/chalice_shrine_house_c
|

| |
| Variant D | ID: pixelmon:shrines/chalice_shrine_house_d
Loot Tables: Builder: Rasgnarok |

| |
| Variant E | ID: pixelmon:shrines/chalice_shrine_house_e
Loot Tables: Builder: Rasgnarok |

| |
| Variant F | ID: pixelmon:shrines/chalice_shrine_house_f
Loot Tables: Builder: Rasgnarok |

| |
| Variant G | ID: pixelmon:shrines/chalice_shrine_house_g
Loot Tables: Builder: Rasgnarok |

| |
| Variant H | ID: pixelmon:shrines/chalice_shrine_house_h
Loot Tables: Builder: Rasgnarok |

| |
| Path | Variant A | ID: pixelmon:shrines/chalice_shrine_path_a
|

|
| Variant B | ID: pixelmon:shrines/chalice_shrine_path_b
|

| |
| Variant C | ID: pixelmon:shrines/chalice_shrine_path_c
|

| |
| Decoration | Variant A | ID: pixelmon:shrines/chalice_shrine_deco_a
|

|
| Variant B | ID: pixelmon:shrines/chalice_shrine_deco_b
|

| |
| Variant C | ID: pixelmon:shrines/chalice_shrine_deco_c
|

| |
| Variant D | ID: pixelmon:shrines/chalice_shrine_deco_d
|

| |
| Variant E | ID: pixelmon:shrines/chalice_shrine_deco_e
|

| |
| Variant F | ID: pixelmon:shrines/chalice_shrine_deco_f
|

| |
| Variant G | ID: pixelmon:shrines/chalice_shrine_deco_g
|

| |
Gallery
A Land Chalice with village
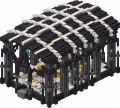
Land Chalice building

Water Chalice
Config settings
- "spawnStructures": If disabled, the Arc Chalice structure(and all other Pixelmon structures) will not spawn naturally.
Trivia
Arc Chalice up to version 8.4.2
