
 NodeCraft
Difference between revisions of "Iron Ingot"
From Pixelmon Wiki
HeroOfTime04 (talk | contribs) (→Pokémon drops: changed the entire drop table) |
|||
| Line 1: | Line 1: | ||
| − | {{VanillaRedirect|Iron_Ingot| | + | {{VanillaRedirect|Iron_Ingot|Iron Ingots}} |
| + | [[File:Grid_Iron_Ingot.png|right]] | ||
Iron ingots can be obtained from smelting {{mc|Iron_Ore|iron ore}}, as [[drops]] from certain wild Pokémon, or from [[Forage]]. | Iron ingots can be obtained from smelting {{mc|Iron_Ore|iron ore}}, as [[drops]] from certain wild Pokémon, or from [[Forage]]. | ||
| − | + | ||
| − | + | __TOC__ | |
| − | + | ||
| − | + | ==Obtaining== | |
| − | + | ===Pokémon drops=== | |
| − | + | {{main|Drops|Drops}} | |
| − | |||
| − | |||
| − | |||
| − | |||
| − | |||
| − | |||
| − | |||
| − | |||
| − | |||
| − | |||
| − | |||
| − | |||
| − | |||
| − | |||
| − | {{ | ||
| − | |||
| − | |||
| − | |||
| − | |||
| − | |||
| − | }} | ||
| − | |||
| − | |||
| − | |||
| − | |||
| − | |||
| − | |||
| − | |||
| − | |||
| − | |||
| − | |||
| − | |||
| − | |||
| − | |||
| − | |||
| − | |||
| − | |||
| − | |||
| − | |||
| − | |||
| − | |||
| − | |||
| − | |||
| − | |||
| − | |||
| − | |||
| − | |||
| − | |||
| − | |||
| − | |||
| − | |||
| − | |||
| − | |||
| − | |||
| − | |||
| − | |||
| − | |||
| − | |||
| − | |||
| − | |||
| − | |||
| − | |||
| − | |||
| − | |||
| − | |||
| − | |||
| − | |||
| − | |||
| − | |||
| − | |||
| − | |||
| − | |||
| − | |||
| − | |||
| − | |||
| − | |||
| − | |||
| − | |||
| − | |||
| − | |||
| − | |||
| − | |||
| − | |||
| − | |||
| − | |||
| − | |||
| − | |||
| − | |||
| − | |||
| − | |||
| − | |||
| − | |||
| − | |||
| − | |||
| − | |||
| − | |||
| − | |||
| − | |||
| − | |||
| − | |||
| − | |||
| − | |||
| − | |||
| − | |||
| − | |||
| − | |||
| − | |||
| − | |||
| − | |||
| − | |||
| − | |||
| − | |||
| − | |||
| − | |||
| − | |||
| − | |||
| − | |||
| − | |||
| − | |||
| − | |||
| − | |||
| − | |||
| − | |||
| − | |||
| − | |||
| − | |||
| − | |||
| − | |||
| − | |||
| − | |||
| − | |||
| − | |||
| − | |||
| − | |||
| − | |||
| − | |||
| − | |||
| − | |||
| − | |||
| − | |||
| − | |||
| − | |||
| − | |||
| − | |||
| − | |||
| − | |||
| − | |||
| − | |||
| − | |||
| − | |||
| − | |||
| − | |||
| − | |||
| − | |||
| − | |||
| − | |||
| − | |||
| − | |||
| − | |||
| − | |||
| − | |||
| − | |||
| − | |||
| − | |||
| − | |||
| − | |||
| − | |||
| − | |||
| − | |||
| − | |||
| − | |||
| − | |||
| − | |||
| − | |||
| − | |||
| − | |||
| − | |||
| − | |||
| − | |||
| − | |||
| − | |||
| − | |||
| − | |||
| − | |||
| − | |||
| − | |||
| − | |||
| − | |||
| − | |||
| − | |||
| − | |||
| − | |||
| − | |||
| − | |||
| − | |||
| − | |||
| − | |||
| − | |||
| − | |||
| − | |||
| − | |||
| − | |||
| − | |||
| − | |||
| − | |||
| − | |||
| − | |||
| − | |||
| − | |||
| − | |||
| − | |||
| − | |||
| − | |||
| − | |||
| − | |||
| − | |||
| − | |||
| − | |||
| − | |||
| − | |||
| − | |||
{{DropPokémonH}} | {{DropPokémonH}} | ||
{{DropPokémon|Aegislash|100|1-3}} | {{DropPokémon|Aegislash|100|1-3}} | ||
| Line 265: | Line 45: | ||
{{DropPokémon|Terrakion|100|2-3}} | {{DropPokémon|Terrakion|100|2-3}} | ||
{{DropPokémonF}} | {{DropPokémonF}} | ||
| + | |||
| + | ===Forage=== | ||
| + | {{main|Forage|Forage}} | ||
| + | {|class="wikitable" | ||
| + | |- | ||
| + | ! Pokémon type | ||
| + | ! Block | ||
| + | ! Chance | ||
| + | |- | ||
| + | |style="text-align:center;background:#{{steel color}}"|{{t|Steel}} | ||
| + | |{{i|Stone}}-based blocks | ||
| + | |style="text-align:center"|{{percent|20|342}} | ||
| + | |} | ||
| + | |||
| + | ===Smelting=== | ||
| + | {|class="mw-collapsible mw-uncollapsed wikitable sortable" | ||
| + | |- | ||
| + | ! Item | ||
| + | ! Ingredients | ||
| + | ! class="unsortable" | Smelting recipe | ||
| + | |- | ||
| + | |[[Iron Ingot]] | ||
| + | |[[Iron Ore]] +<br>Any fuel | ||
| + | |{{Grid/Furnace | ||
| + | |Top=Iron Ore | ||
| + | |Output=Iron Ingot}} | ||
| + | |} | ||
| + | |||
| + | ==Usage== | ||
| + | Iron ingots are needed to craft a variety of different [[items]] in Pixelmon. [[Move tutors]] also sometimes require iron ingots as payment for their services. | ||
| + | |||
| + | ===Crafting ingredient=== | ||
| + | {|class="mw-collapsible mw-uncollapsed wikitable sortable" | ||
| + | |- | ||
| + | ! Item | ||
| + | ! Ingredients | ||
| + | ! class="unsortable" | Crafting recipe | ||
| + | |- | ||
| + | |style="text-align:center"|[[Block of Iron]] | ||
| + | |[[Iron Ingot]] | ||
| + | |{{Grid/Crafting Table | ||
| + | |A1=Iron Ingot |B1=Iron Ingot |C1=Iron Ingot | ||
| + | |A2=Iron Ingot |B2=Iron Ingot |C2=Iron Ingot | ||
| + | |A3=Iron Ingot |B3=Iron Ingot |C3=Iron Ingot | ||
| + | |Output=Block of Iron | ||
| + | |nobreak=y}} | ||
| + | |- | ||
| + | |style="text-align:center"|[[Iron Bars]] | ||
| + | |[[Iron Ingot]] | ||
| + | |{{Grid/Crafting Table | ||
| + | |A2=Iron Ingot |B2=Iron Ingot |C2=Iron Ingot | ||
| + | |A3=Iron Ingot |B3=Iron Ingot |C3=Iron Ingot | ||
| + | |Output=Iron Bars |OA=16 | ||
| + | |nobreak=y}} | ||
| + | |- | ||
| + | |style="text-align:center"|[[Piston]] | ||
| + | |Any [[Wood Planks]] +<br>[[Cobblestone]] +<br>[[Iron Ingot]] +<br>[[Redstone]] | ||
| + | |{{Grid/Crafting Table | ||
| + | |A1=Wood Planks |B1=Wood Planks |C1=Wood Planks | ||
| + | |A2=Cobblestone |B2=Iron Ingot |C2=Cobblestone | ||
| + | |A3=Cobblestone |B3=Redstone |C3=Cobblestone | ||
| + | |Output=Piston | ||
| + | |nobreak=y}} | ||
| + | |- | ||
| + | |style="text-align:center"|[[Iron Door]] | ||
| + | |[[Iron Ingot]] | ||
| + | |{{Grid/Crafting Table | ||
| + | |A1=Iron Ingot |B1=Iron Ingot | ||
| + | |A2=Iron Ingot |B2=Iron Ingot | ||
| + | |A3=Iron Ingot |B3=Iron Ingot | ||
| + | |Output=Iron Door |OA=3 | ||
| + | |nobreak=y}} | ||
| + | |- | ||
| + | |style="text-align:center"|[[Iron Sword]] | ||
| + | |[[Iron Ingot]] +<br>[[Stick]] | ||
| + | |{{Grid/Crafting Table | ||
| + | |B1=Iron Ingot | ||
| + | |B2=Iron Ingot | ||
| + | |B3=Stick | ||
| + | |Output=Iron Sword | ||
| + | |nobreak=y}} | ||
| + | |- | ||
| + | |style="text-align:center"|[[Iron Helmet]] | ||
| + | |[[Iron Ingot]] | ||
| + | |{{Grid/Crafting Table | ||
| + | |A1=Iron Ingot |B1=Iron Ingot |C1=Iron Ingot | ||
| + | |A2=Iron Ingot |C2=Iron Ingot | ||
| + | |Output=Iron Helmet | ||
| + | |nobreak=y}} | ||
| + | |- | ||
| + | |style="text-align:center"|[[Iron Chestplate]] | ||
| + | |[[Iron Ingot]] | ||
| + | |{{Grid/Crafting Table | ||
| + | |A1=Iron Ingot |C1=Iron Ingot | ||
| + | |A2=Iron Ingot |B2=Iron Ingot |C2=Iron Ingot | ||
| + | |A3=Iron Ingot |B3=Iron Ingot |C3=Iron Ingot | ||
| + | |Output=Iron Chestplate | ||
| + | |nobreak=y}} | ||
| + | |- | ||
| + | |style="text-align:center"|[[Bucket]] | ||
| + | |[[Iron Ingot]] | ||
| + | |{{Grid/Crafting Table | ||
| + | |A2=Iron Ingot |C2=Iron Ingot | ||
| + | |B3=Iron Ingot | ||
| + | |Output=Bucket | ||
| + | |nobreak=y}} | ||
| + | |- | ||
| + | |style="text-align:center"|[[Healer]] | ||
| + | |[[Aluminum Plate]] +<br>[[Iron Ingot]] +<br>[[Diamond]] | ||
| + | |{{Grid/Crafting Table | ||
| + | |A1=Aluminum Plate |B1=Iron Ingot |C1=Aluminum Plate | ||
| + | |A2=Iron Ingot |B2=Diamond |C2=Iron Ingot | ||
| + | |A3=Aluminum Plate |B3=Iron Ingot |C3=Aluminum Plate | ||
| + | |Output=Healer | ||
| + | |nobreak=y}} | ||
| + | |- | ||
| + | |style="text-align:center"|[[Anvil]] | ||
| + | |[[Iron Ingot]] | ||
| + | |{{Grid/Crafting Table | ||
| + | |A1=Iron Ingot |B1=Iron Ingot |C1=Iron Ingot | ||
| + | |A2=Iron Ingot |B2=Iron Ingot |C2= | ||
| + | |A3=Iron Ingot |B3=Iron Ingot |C3=Iron Ingot | ||
| + | |Output=Anvil | ||
| + | |nobreak=y}} | ||
| + | |- | ||
| + | |style="text-align:center"|[[Elevator]] | ||
| + | |[[Iron Ingot]] +<br>[[Redstone]] | ||
| + | |{{Grid/Crafting Table | ||
| + | |A1=Iron Ingot|B1=Iron Ingot|C1=Iron Ingot | ||
| + | |A2=Iron Ingot|B2=Redstone|C2=Iron Ingot | ||
| + | |A3=Iron Ingot|B3=Iron Ingot|C3=Iron Ingot | ||
| + | |Output=Elevator | ||
| + | |nobreak=y}} | ||
| + | |- | ||
| + | |style="text-align:center"|[[Trash Can]] | ||
| + | |[[Iron Ingot]] +<br>[[Bucket]] | ||
| + | |{{Grid/Crafting Table | ||
| + | |A1=Iron Ingot |C1=Iron Ingot | ||
| + | |B2=Bucket | ||
| + | |Output=Trash Can | ||
| + | |nobreak=y}} | ||
| + | |- | ||
| + | |style="text-align:center"|[[Clock]] | ||
| + | |[[Iron Ingot]] +<br>Matching [[Dye]] +<br>[[Clock]] | ||
| + | |{{Grid/Crafting Table | ||
| + | |A1=Iron Ingot |B1=Iron Ingot |C1=Iron Ingot | ||
| + | |A2=Iron Ingot |B2=Dye |C2=Iron Ingot | ||
| + | |A3=Iron Ingot |B3=Clock |C3=Iron Ingot | ||
| + | |Output=Red Clock | ||
| + | |Output-link=Clock | ||
| + | |nobreak=y}} | ||
| + | |- | ||
| + | |style="text-align:center"|[[Cushion Chair]] | ||
| + | |[[White Wool]] +<br>Matching [[Dye]] +<br>[[Iron Ingot]] | ||
| + | |{{Grid/Crafting Table | ||
| + | |A1=White Wool |B1=Dye |C1=White Wool | ||
| + | |B2=Iron Ingot | ||
| + | |B3=Iron Ingot | ||
| + | |Output=Cushion Chair | ||
| + | |nobreak=y}} | ||
| + | |- | ||
| + | |style="text-align:center"|[[Vending Machine]] | ||
| + | |[[Iron Ingot]] +<br>[[Glass Pane]] +<br>[[Fresh Water]] +<br>[[Soda Pop]] +<br>[[Lemonade]] +<br>Matching [[Dye]] +<br>[[Redstone]] | ||
| + | |{{Grid/Crafting Table | ||
| + | |A1=Iron Ingot |B1=Glass Pane |C1=Iron Ingot | ||
| + | |A2=Fresh Water |B2=Soda Pop |C2=Lemonade | ||
| + | |A3=Iron Ingot |B3=Dye |C3=Redstone | ||
| + | |Output=Vending Machine | ||
| + | |nobreak=y}} | ||
| + | |- | ||
| + | |style="text-align:center"|[[Street Light]] | ||
| + | |[[Iron Ingot]] +<br>[[Torch]] +<br>[[Glass Pane]] | ||
| + | |{{Grid/Crafting Table | ||
| + | |A2=Iron Ingot |B2=Torch |C2=Iron Ingot | ||
| + | |B3=Glass Pane | ||
| + | |Output=Street Light | ||
| + | |nobreak=y}} | ||
| + | |- | ||
| + | |style="text-align:center"|[[Wailmer Pail]] | ||
| + | |[[Bone]] +<br>[[Water Bucket]] +<br>[[Iron Ingot]] | ||
| + | |{{Grid/Crafting Table | ||
| + | |A1=Bone |B1=Bone |C1=Bone | ||
| + | |B2=Water Bucket | ||
| + | |A3=Iron Ingot |B3=Iron Ingot |C3=Iron Ingot | ||
| + | |Output=Wailmer Pail | ||
| + | |nobreak=y}} | ||
| + | |- | ||
| + | |style="text-align:center"|[[Handles]] | ||
| + | |[[Leather]] +<br>[[Iron Ingot]] +<br>[[Stick]] | ||
| + | |{{Grid/Crafting Table | ||
| + | |A1=Leather |B1=Iron Ingot |C1=Leather | ||
| + | |B2=Stick | ||
| + | |B3=Stick | ||
| + | |Output=Handles | ||
| + | |nobreak=y}} | ||
| + | |- | ||
| + | |style="text-align:center"|[[Wheel]] | ||
| + | |[[Silicon]] +<br>[[Iron Ingot]] | ||
| + | |{{Grid/Crafting Table | ||
| + | |A1=Silicon |B1=Silicon |C1=Silicon | ||
| + | |A2=Silicon |B2=Iron Ingot |C2=Silicon | ||
| + | |A3=Silicon |B3=Silicon |C3=Silicon | ||
| + | |Output=Wheel | ||
| + | |nobreak=y}} | ||
| + | |- | ||
| + | |style="text-align:center"|[[Old Running Shoes]] | ||
| + | |[[Iron Ingot]] +<br>[[Leather Boots]] +<br>[[Feather]] | ||
| + | |{{Grid/Crafting Table | ||
| + | |A1=Iron Ingot |B1=Leather Boots|C1=Iron Ingot | ||
| + | |A2=Iron Ingot |C2=Iron Ingot | ||
| + | |A3=Feather |C3=Feather | ||
| + | |Output=Old Running Shoes | ||
| + | |nobreak=y}} | ||
| + | |- | ||
| + | |style="text-align:center"|[[New Running Shoes]] | ||
| + | |[[Diamond]] +<br>[[Old Running Shoes]] +<br>[[Iron Ingot]] +<br>[[Feather]] | ||
| + | |{{Grid/Crafting Table | ||
| + | |A1=Diamond |B1=Old Running Shoes |C1=Diamond | ||
| + | |A2=Iron Ingot |C2=Iron Ingot | ||
| + | |A3=Feather |C3=Feather | ||
| + | |Output=New Running Shoes | ||
| + | |nobreak=y}} | ||
| + | |- | ||
| + | |style="text-align:center"|[[Iron Hammer]] | ||
| + | |[[Iron Ingot]] +<br>[[Stick]] | ||
| + | |{{Grid/Crafting Table | ||
| + | |A1=Iron Ingot |B1=Iron Ingot |C1=Iron Ingot | ||
| + | |A2=Iron Ingot |B2=Stick |C2=Iron Ingot | ||
| + | |B3=Stick | ||
| + | |Output=Iron Hammer | ||
| + | |nobreak=y}} | ||
| + | |- | ||
| + | |style="text-align:center"|[[Iron Disc]] | ||
| + | |[[Iron Ingot]] | ||
| + | |{{Grid/Crafting Table | ||
| + | |A2=Iron Ingot |B2=Iron Ingot |C2=Iron Ingot | ||
| + | |Output=Iron Disc |OA=5 | ||
| + | |nobreak=y}} | ||
| + | |- | ||
| + | |style="text-align:center"|[[Iron Lure Casing]] | ||
| + | |[[Crystal]] +<br>[[Iron Ingot]] | ||
| + | |{{Grid/Crafting Table | ||
| + | |A1=Crystal |B1=Iron Ingot |C1=Crystal | ||
| + | |A2=Iron Ingot |C2=Iron Ingot | ||
| + | |A3=Crystal |B3=Iron Ingot |C3=Crystal | ||
| + | |Output=Iron Lure Casing}} | ||
| + | |} | ||
| + | |||
| + | ==Trivia== | ||
| + | |||
| + | {|class="mw-collapsible mw-uncollapsed wikitable sortable" | ||
| + | |- | ||
| + | ! Item | ||
| + | ! Ingredients | ||
| + | ! class="unsortable" | Crafting recipe | ||
| + | |- | ||
| + | |style="text-align:center"|[[Clock]] | ||
| + | |[[Iron Ingot]] +<br>Matching [[Apricorn]] +<br>[[Clock]] | ||
| + | |{{Grid/Crafting Table | ||
| + | |A1=Iron Ingot |B1=Iron Ingot |C1=Iron Ingot | ||
| + | |A2=Iron Ingot |B2=Apricorn |C2=Iron Ingot | ||
| + | |A3=Iron Ingot |B3=Clock |C3=Iron Ingot | ||
| + | |Output=Red Clock | ||
| + | |Output-link=Clock | ||
| + | |nobreak=y}} | ||
| + | |- | ||
| + | |style="text-align:center"|[[Cushion Chair]] | ||
| + | |[[White Wool]] +<br>Matching [[Apricorn]] +<br>[[Iron Ingot]] | ||
| + | |{{Grid/Crafting Table | ||
| + | |A1=White Wool |B1=Apricorn |C1=White Wool | ||
| + | |B2=Iron Ingot | ||
| + | |B3=Iron Ingot | ||
| + | |Output=Cushion Chair | ||
| + | |nobreak=y}} | ||
| + | |- | ||
| + | |style="text-align:center"|[[Macho Brace]] | ||
| + | |[[Cactus Green]] +<br>[[Iron Ingot]] +<br>[[Aluminum Ingot]] | ||
| + | |{{Grid/Crafting Table | ||
| + | |A1=Cactus Green |B1=Iron Ingot |C1=Aluminum Ingot | ||
| + | |A2=Iron Ingot |B2=Aluminum Ingot |C2=Iron Ingot | ||
| + | |A3=Aluminum Ingot |B3=Iron Ingot |C3=Cactus Green | ||
| + | |Output=Macho Brace | ||
| + | |nobreak=y}} | ||
| + | |- | ||
| + | |style="text-align:center"|[[Wide Lens]] | ||
| + | |[[Iron Ingot]] +<br>[[Glass Pane]] | ||
| + | |{{Grid/Crafting Table | ||
| + | |A1=Iron Ingot |B1=Glass Pane | ||
| + | |A2=Iron Ingot |B2=Glass Pane | ||
| + | |A3=Iron Ingot | ||
| + | |Output=Wide Lens | ||
| + | |nobreak=y}} | ||
| + | |- | ||
| + | |style="text-align:center"|[[Metronome (item)|Metronome]] | ||
| + | |[[Oak Wood Planks]] +<br>[[Iron Ingot]] | ||
| + | |{{Grid/Crafting Table | ||
| + | |B1=Iron Ingot | ||
| + | |A2=Oak Wood Planks |B2=Iron Ingot |C2=Oak Wood Planks | ||
| + | |A3=Oak Wood Planks |B3=Oak Wood Planks |C3=Oak Wood Planks | ||
| + | |Output=Metronome | ||
| + | |Output-link=Metronome (item) | ||
| + | |nobreak=y}} | ||
| + | |- | ||
| + | |style="text-align:center"|[[Metal Coat]] | ||
| + | |[[Iron Ingot]] +<br>[[Aluminum Plate]] +<br>[[Block of Iron]] | ||
| + | |{{Grid/Crafting Table | ||
| + | |A1=Iron Ingot |B1=Aluminum Plate |C1=Iron Ingot | ||
| + | |A2=Aluminum Plate |B2=Block of Iron |C2=Aluminum Plate | ||
| + | |A3=Iron Ingot |B3=Aluminum Plate |C3=Iron Ingot | ||
| + | |Output=Metal Coat | ||
| + | |nobreak=y}} | ||
| + | |- | ||
| + | |style="text-align:center"|[[Magmarizer]] | ||
| + | |[[Iron Ingot]] +<br>[[Rose Red]] +<br>[[Furnace]] +<br>[[Lava Bucket]] | ||
| + | |{{Grid/Crafting Table | ||
| + | |A1=Iron Ingot|B1=Iron Ingot|C1=Iron Ingot | ||
| + | |A2=Rose Red|B2=Furnace|C2=Rose Red | ||
| + | |A3=Iron Ingot |B3=Lava Bucket |C3=Iron Ingot | ||
| + | |Output=Magmarizer | ||
| + | |nobreak=y}} | ||
| + | |- | ||
| + | |style="text-align:center"|[[Scope Lens]] | ||
| + | |[[Iron Ingot]] +<br>[[Aluminum Ingot]] +<br>[[Glass Pane]] | ||
| + | |{{Grid/Crafting Table | ||
| + | |A1=Iron Ingot |B1=Aluminum Ingot |C1=Glass Pane | ||
| + | |A2=Iron Ingot |B2=Aluminum Ingot |C2=Glass Pane | ||
| + | |A3=Iron Ingot | ||
| + | |Output=Scope Lens | ||
| + | |nobreak=y}} | ||
| + | |- | ||
| + | |style="text-align:center"|[[Eject Button]] | ||
| + | |[[Iron Ingot]] +<br>[[Button]] | ||
| + | |{{Grid/Crafting Table | ||
| + | |A1=Iron Ingot |B1=Iron Ingot |C1=Iron Ingot | ||
| + | |A2=Iron Ingot |B2=Button |C2=Iron Ingot | ||
| + | |A3=Iron Ingot |B3=Iron Ingot |C3=Iron Ingot | ||
| + | |Output=Eject Button | ||
| + | |nobreak=y}} | ||
| + | |- | ||
| + | |style="text-align:center"|[[Twisted Spoon]] | ||
| + | |[[Iron Ingot]] +<br>[[Ender Pearl]] | ||
| + | |{{Grid/Crafting Table | ||
| + | |A1=Iron Ingot |B1=Iron Ingot |C1=Iron Ingot | ||
| + | |A2=Iron Ingot |B2=Ender Pearl | ||
| + | |A3=Iron Ingot | ||
| + | |Output=Twisted Spoon | ||
| + | |nobreak=y}} | ||
| + | |- | ||
| + | |style="text-align:center"|[[Magnet]] | ||
| + | |[[Iron Ingot]] +<br>[[Rose Red]] +<br>[[Lapis Lazuli]] | ||
| + | |{{Grid/Crafting Table | ||
| + | |A1=Iron Ingot |B1=Iron Ingot |C1=Iron Ingot | ||
| + | |A2=Iron Ingot |C2=Iron Ingot | ||
| + | |A3=Rose Red |C3=Lapis Lazuli | ||
| + | |Output=Magnet | ||
| + | |nobreak=y}} | ||
| + | |} | ||
| + | |||
[[Category:Items]] | [[Category:Items]] | ||
Revision as of 07:07, 8 September 2020
For information on Iron Ingots in vanilla Minecraft, see this page.

Iron ingots can be obtained from smelting iron ore, as drops from certain wild Pokémon, or from Forage.
Contents
Obtaining
Pokémon drops
Main article: Drops
| Pokémon | Chance | Quantity |
|---|---|---|
| Aegislash | 100% | 1-3 |
| Aggron | 100% | 1-4 |
| Bastiodon | 100% | 1-2 |
| Bisharp | 100% | 2-4 |
| Bronzong | 66.667% | 1-2 |
| Diglett | 66.667% | 1-2 |
| Doublade | 100% | 1-2 |
| Dugtrio | 75% | 1-3 |
| Durant | 100% | 1 |
| Escavalier | 100% | 1-3 |
| Excadrill | 50% | 1 |
| Ferrothorn | 66.667% | 1-2 |
| Genesect | 100% | 3-5 |
| Gurdurr | 66.667% | 1-2 |
| Honedge | 100% | 1 |
| Jirachi | 100% | 6-8 |
| Klang | 66.667% | 1-2 |
| Klefki | 100% | 1-3 |
| Klinklang | 75% | 1-3 |
| Lairon | 100% | 1-2 |
| Lucario | 66.667% | 1-2 |
| Magearna | 100% | 3-6 |
| Magnemite | 50% | 1 |
| Magnezone | 66.667% | 1-2 |
| Mawile | 100% | 1-2 |
| Metagross | 100% | 4-6 |
| Metang | 100% | 2-4 |
| Pawniard | 100% | 1-2 |
| Registeel | 100% | 5-8 |
| Scizor | 100% | 1-3 |
| Skarmory | 66.667% | 1-2 |
| Solgaleo | 100% | 4-8 |
| Steelix | 100% | 1-3 |
| Terrakion | 100% | 2-3 |
Forage
Main article: Forage
| Pokémon type | Block | Chance |
|---|---|---|
| 5.848% |
Smelting
| Item | Ingredients | Smelting recipe |
|---|---|---|
| Iron Ingot | Iron Ore + Any fuel |
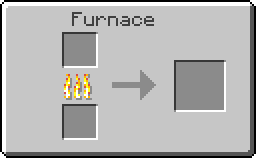 |
Usage
Iron ingots are needed to craft a variety of different items in Pixelmon. Move tutors also sometimes require iron ingots as payment for their services.
Crafting ingredient
Trivia
| Item | Ingredients | Crafting recipe |
|---|---|---|
| Clock | Iron Ingot + Matching Apricorn + Clock |
|
| Cushion Chair | White Wool + Matching Apricorn + Iron Ingot |
|
| Macho Brace | Cactus Green + Iron Ingot + Aluminum Ingot |
|
| Wide Lens | Iron Ingot + Glass Pane |
|
| Metronome | Oak Wood Planks + Iron Ingot |
|
| Metal Coat | Iron Ingot + Aluminum Plate + Block of Iron |
|
| Magmarizer | Iron Ingot + Rose Red + Furnace + Lava Bucket |
|
| Scope Lens | Iron Ingot + Aluminum Ingot + Glass Pane |
|
| Eject Button | Iron Ingot + Button |
|
| Twisted Spoon | Iron Ingot + Ender Pearl |
|
| Magnet | Iron Ingot + Rose Red + Lapis Lazuli |
|