
 NodeCraft
Difference between revisions of "Haunted Tower"
(Updated to 9.0.10) |
m (→Structures: Added images) |
||
| (5 intermediate revisions by 2 users not shown) | |||
| Line 3: | Line 3: | ||
==Loot== | ==Loot== | ||
| + | ===Haunted Tower=== | ||
Each haunted tower chest contains items drawn from 3 pools (one per category), with the following distribution: | Each haunted tower chest contains items drawn from 3 pools (one per category), with the following distribution: | ||
{|class="wikitable sortable" | {|class="wikitable sortable" | ||
| Line 9: | Line 10: | ||
! class="unsortable" colspan="2" |{{tt|Stack size|The size of stacks (or for unstackable items, number) of this item in any given roll.}} | ! class="unsortable" colspan="2" |{{tt|Stack size|The size of stacks (or for unstackable items, number) of this item in any given roll.}} | ||
! class="unsortable" colspan="2" |{{tt|Weight|The weight of this item relative to other items in the pool.}} | ! class="unsortable" colspan="2" |{{tt|Weight|The weight of this item relative to other items in the pool.}} | ||
| + | ! rowspan="2" |{{tt|Chance|The odds of finding any of this itemin a single chest.}} | ||
| + | ! rowspan="2" |{{tt|Avg.{{-}}per chest|The number of items expected per chest, averaged over a large number of chests.}} | ||
|- | |- | ||
!{{tt|1x|The chest draws 1 stack(s) randomly from this pool.}} | !{{tt|1x|The chest draws 1 stack(s) randomly from this pool.}} | ||
| Line 21: | Line 24: | ||
|style="text-align:center"|{{frac|1|33}} | |style="text-align:center"|{{frac|1|33}} | ||
|style="text-align:center"|— | |style="text-align:center"|— | ||
| + | |style="text-align:center"|{{percent|3|100}} | ||
| + | |style="text-align:center"|0.030 | ||
|- | |- | ||
|style="text-align:center"|Held Items | |style="text-align:center"|Held Items | ||
| Line 28: | Line 33: | ||
|style="text-align:center"|{{frac|1|33}} | |style="text-align:center"|{{frac|1|33}} | ||
|style="text-align:center"|— | |style="text-align:center"|— | ||
| + | |style="text-align:center"|{{percent|3|100}} | ||
| + | |style="text-align:center"|0.030 | ||
|- | |- | ||
|style="text-align:center"|Held Items | |style="text-align:center"|Held Items | ||
| Line 35: | Line 42: | ||
|style="text-align:center"|{{frac|1|33}} | |style="text-align:center"|{{frac|1|33}} | ||
|style="text-align:center"|— | |style="text-align:center"|— | ||
| + | |style="text-align:center"|{{percent|3|100}} | ||
| + | |style="text-align:center"|0.030 | ||
|- | |- | ||
|style="text-align:center"|Treasure | |style="text-align:center"|Treasure | ||
| Line 42: | Line 51: | ||
|style="text-align:center"|{{frac|2|34}} | |style="text-align:center"|{{frac|2|34}} | ||
|style="text-align:center"|— | |style="text-align:center"|— | ||
| + | |style="text-align:center"|{{percent|5.9|100}} | ||
| + | |style="text-align:center"|0.059 | ||
|- | |- | ||
|style="text-align:center"|Treasure | |style="text-align:center"|Treasure | ||
| Line 49: | Line 60: | ||
|style="text-align:center"|{{frac|1|34}} | |style="text-align:center"|{{frac|1|34}} | ||
|style="text-align:center"|— | |style="text-align:center"|— | ||
| + | |style="text-align:center"|{{percent|2.9|100}} | ||
| + | |style="text-align:center"|0.029 | ||
|- | |- | ||
|style="text-align:center"|Treasure | |style="text-align:center"|Treasure | ||
| Line 56: | Line 69: | ||
|style="text-align:center"|{{frac|3|34}} | |style="text-align:center"|{{frac|3|34}} | ||
|style="text-align:center"|— | |style="text-align:center"|— | ||
| + | |style="text-align:center"|{{percent|8.8|100}} | ||
| + | |style="text-align:center"|0.088 | ||
|- | |- | ||
|style="text-align:center"|Treasure | |style="text-align:center"|Treasure | ||
| Line 63: | Line 78: | ||
|style="text-align:center"|{{frac|1|34}} | |style="text-align:center"|{{frac|1|34}} | ||
|style="text-align:center"|— | |style="text-align:center"|— | ||
| + | |style="text-align:center"|{{percent|2.9|100}} | ||
| + | |style="text-align:center"|0.029 | ||
|- | |- | ||
|style="text-align:center"|Treasure | |style="text-align:center"|Treasure | ||
| Line 70: | Line 87: | ||
|style="text-align:center"|{{frac|3|34}} | |style="text-align:center"|{{frac|3|34}} | ||
|style="text-align:center"|— | |style="text-align:center"|— | ||
| + | |style="text-align:center"|{{percent|8.8|100}} | ||
| + | |style="text-align:center"|0.088 | ||
|- | |- | ||
|style="text-align:center"|Treasure | |style="text-align:center"|Treasure | ||
| Line 77: | Line 96: | ||
|style="text-align:center"|{{frac|2|34}} | |style="text-align:center"|{{frac|2|34}} | ||
|style="text-align:center"|— | |style="text-align:center"|— | ||
| + | |style="text-align:center"|{{percent|5.9|100}} | ||
| + | |style="text-align:center"|0.059 | ||
|- | |- | ||
|style="text-align:center"|Treasure | |style="text-align:center"|Treasure | ||
| Line 84: | Line 105: | ||
|style="text-align:center"|{{frac|1|34}} | |style="text-align:center"|{{frac|1|34}} | ||
|style="text-align:center"|— | |style="text-align:center"|— | ||
| + | |style="text-align:center"|{{percent|2.9|100}} | ||
| + | |style="text-align:center"|0.029 | ||
|- | |- | ||
|style="text-align:center"|Treasure | |style="text-align:center"|Treasure | ||
| Line 91: | Line 114: | ||
|style="text-align:center"|{{frac|3|34}} | |style="text-align:center"|{{frac|3|34}} | ||
|style="text-align:center"|— | |style="text-align:center"|— | ||
| + | |style="text-align:center"|{{percent|8.8|100}} | ||
| + | |style="text-align:center"|0.088 | ||
|- | |- | ||
|style="text-align:center"|Treasure | |style="text-align:center"|Treasure | ||
| Line 98: | Line 123: | ||
|style="text-align:center"|{{frac|2|34}} | |style="text-align:center"|{{frac|2|34}} | ||
|style="text-align:center"|— | |style="text-align:center"|— | ||
| + | |style="text-align:center"|{{percent|5.9|100}} | ||
| + | |style="text-align:center"|0.059 | ||
|- | |- | ||
|style="text-align:center"|Treasure | |style="text-align:center"|Treasure | ||
| Line 105: | Line 132: | ||
|style="text-align:center"|{{frac|1|34}} | |style="text-align:center"|{{frac|1|34}} | ||
|style="text-align:center"|— | |style="text-align:center"|— | ||
| + | |style="text-align:center"|{{percent|2.9|100}} | ||
| + | |style="text-align:center"|0.029 | ||
|- | |- | ||
|style="text-align:center"|Vanilla | |style="text-align:center"|Vanilla | ||
| Line 112: | Line 141: | ||
|style="text-align:center"|— | |style="text-align:center"|— | ||
|style="text-align:center"|{{frac|10|63}} | |style="text-align:center"|{{frac|10|63}} | ||
| + | |style="text-align:center"|{{percent|44.4|100}} | ||
| + | |style="text-align:center"|4.444 | ||
|- | |- | ||
|style="text-align:center"|Vanilla | |style="text-align:center"|Vanilla | ||
| Line 119: | Line 150: | ||
|style="text-align:center"|— | |style="text-align:center"|— | ||
|style="text-align:center"|{{frac|10|63}} | |style="text-align:center"|{{frac|10|63}} | ||
| + | |style="text-align:center"|{{percent|44.4|100}} | ||
| + | |style="text-align:center"|1.667 | ||
|- | |- | ||
|style="text-align:center"|Vanilla | |style="text-align:center"|Vanilla | ||
| Line 126: | Line 159: | ||
|style="text-align:center"|— | |style="text-align:center"|— | ||
|style="text-align:center"|{{frac|7|63}} | |style="text-align:center"|{{frac|7|63}} | ||
| + | |style="text-align:center"|{{percent|33.2|100}} | ||
| + | |style="text-align:center"|0.778 | ||
|- | |- | ||
|style="text-align:center"|Vanilla | |style="text-align:center"|Vanilla | ||
| Line 133: | Line 168: | ||
|style="text-align:center"|— | |style="text-align:center"|— | ||
|style="text-align:center"|{{frac|7|63}} | |style="text-align:center"|{{frac|7|63}} | ||
| + | |style="text-align:center"|{{percent|33.2|100}} | ||
| + | |style="text-align:center"|2.139 | ||
|- | |- | ||
|style="text-align:center"|Vanilla | |style="text-align:center"|Vanilla | ||
| Line 140: | Line 177: | ||
|style="text-align:center"|— | |style="text-align:center"|— | ||
|style="text-align:center"|{{frac|7|63}} | |style="text-align:center"|{{frac|7|63}} | ||
| + | |style="text-align:center"|{{percent|33.2|100}} | ||
| + | |style="text-align:center"|1.167 | ||
|- | |- | ||
|style="text-align:center"|Vanilla | |style="text-align:center"|Vanilla | ||
| Line 147: | Line 186: | ||
|style="text-align:center"|— | |style="text-align:center"|— | ||
|style="text-align:center"|{{frac|7|63}} | |style="text-align:center"|{{frac|7|63}} | ||
| + | |style="text-align:center"|{{percent|33.2|100}} | ||
| + | |style="text-align:center"|2.139 | ||
|- | |- | ||
|style="text-align:center"|Vanilla | |style="text-align:center"|Vanilla | ||
| Line 154: | Line 195: | ||
|style="text-align:center"|— | |style="text-align:center"|— | ||
|style="text-align:center"|{{frac|3|63}} | |style="text-align:center"|{{frac|3|63}} | ||
| + | |style="text-align:center"|{{percent|15.6|100}} | ||
| + | |style="text-align:center"|0.500 | ||
|- | |- | ||
|style="text-align:center"|Vanilla | |style="text-align:center"|Vanilla | ||
| Line 161: | Line 204: | ||
|style="text-align:center"|— | |style="text-align:center"|— | ||
|style="text-align:center"|{{frac|5|63}} | |style="text-align:center"|{{frac|5|63}} | ||
| + | |style="text-align:center"|{{percent|24.8|100}} | ||
| + | |style="text-align:center"|0.417 | ||
|- | |- | ||
|style="text-align:center"|Vanilla | |style="text-align:center"|Vanilla | ||
| Line 168: | Line 213: | ||
|style="text-align:center"|— | |style="text-align:center"|— | ||
|style="text-align:center"|{{frac|1|63}} | |style="text-align:center"|{{frac|1|63}} | ||
| + | |style="text-align:center"|{{percent|5.4|100}} | ||
| + | |style="text-align:center"|0.028 | ||
|- | |- | ||
|style="text-align:center"|Vanilla | |style="text-align:center"|Vanilla | ||
| Line 175: | Line 222: | ||
|style="text-align:center"|— | |style="text-align:center"|— | ||
|style="text-align:center"|{{frac|1|63}} | |style="text-align:center"|{{frac|1|63}} | ||
| + | |style="text-align:center"|{{percent|5.4|100}} | ||
| + | |style="text-align:center"|0.028 | ||
|- | |- | ||
|style="text-align:center"|Vanilla | |style="text-align:center"|Vanilla | ||
| Line 182: | Line 231: | ||
|style="text-align:center"|— | |style="text-align:center"|— | ||
|style="text-align:center"|{{frac|5|63}} | |style="text-align:center"|{{frac|5|63}} | ||
| + | |style="text-align:center"|{{percent|24.8|100}} | ||
| + | |style="text-align:center"|0.417 | ||
| + | |} | ||
| + | |||
| + | ===Haunted Village=== | ||
| + | Each haunted house chest contains items drawn from 2 pools (one per category), with the following distribution: | ||
| + | {|class="wikitable sortable" | ||
| + | ! rowspan="2" | Category | ||
| + | ! rowspan="2" | Item | ||
| + | ! class="unsortable" colspan="2" |{{tt|Stack size|The size of stacks (or for unstackable items, number) of this item in any given roll.}} | ||
| + | ! class="unsortable" colspan="2" |{{tt|Weight|The weight of this item relative to other items in the pool.}} | ||
| + | ! rowspan="2" |{{tt|Chance|The odds of finding any of this itemin a single chest.}} | ||
| + | ! rowspan="2" |{{tt|Avg.{{-}}per chest|The number of items expected per chest, averaged over a large number of chests.}} | ||
| + | |- | ||
| + | !{{tt|1-2x|The chest draws 1–2 stack(s) randomly from this pool.}} | ||
| + | !{{tt|3-5x|The chest draws 3–5 stack(s) randomly from this pool.}} | ||
| + | !{{tt|1-2x|The chest draws 1–2 stack(s) randomly from this pool.}} | ||
| + | !{{tt|3-5x|The chest draws 3–5 stack(s) randomly from this pool.}} | ||
| + | |- | ||
| + | |style="text-align:center"|Gems | ||
| + | |{{i|Ghost Gem}} | ||
| + | |style="text-align:center"|1–3 | ||
| + | |style="text-align:center"|— | ||
| + | |style="text-align:center"|{{frac|5|25}} | ||
| + | |style="text-align:center"|— | ||
| + | |style="text-align:center"|{{percent|28|100}} | ||
| + | |style="text-align:center"|0.600 | ||
| + | |- | ||
| + | |style="text-align:center"|Gems | ||
| + | |{{i|Dark Gem}} | ||
| + | |style="text-align:center"|1–3 | ||
| + | |style="text-align:center"|— | ||
| + | |style="text-align:center"|{{frac|5|25}} | ||
| + | |style="text-align:center"|— | ||
| + | |style="text-align:center"|{{percent|28|100}} | ||
| + | |style="text-align:center"|0.600 | ||
| + | |- | ||
| + | |style="text-align:center"|Vanilla | ||
| + | |{{i|Bone}} | ||
| + | |style="text-align:center"|— | ||
| + | |style="text-align:center"|1–5 | ||
| + | |style="text-align:center"|— | ||
| + | |style="text-align:center"|{{frac|10|63}} | ||
| + | |style="text-align:center"|{{percent|49.4|100}} | ||
| + | |style="text-align:center"|1.905 | ||
| + | |- | ||
| + | |style="text-align:center"|Vanilla | ||
| + | |{{i|Spider Eye}} | ||
| + | |style="text-align:center"|— | ||
| + | |style="text-align:center"|1–5 | ||
| + | |style="text-align:center"|— | ||
| + | |style="text-align:center"|{{frac|10|63}} | ||
| + | |style="text-align:center"|{{percent|49.4|100}} | ||
| + | |style="text-align:center"|1.905 | ||
| + | |- | ||
| + | |style="text-align:center"|Vanilla | ||
| + | |{{i|Bone Meal}} | ||
| + | |style="text-align:center"|— | ||
| + | |style="text-align:center"|1–5 | ||
| + | |style="text-align:center"|— | ||
| + | |style="text-align:center"|{{frac|10|63}} | ||
| + | |style="text-align:center"|{{percent|49.4|100}} | ||
| + | |style="text-align:center"|1.905 | ||
| + | |- | ||
| + | |style="text-align:center"|Vanilla | ||
| + | |{{i|Skeleton Skull}} | ||
| + | |style="text-align:center"|— | ||
| + | |style="text-align:center"|1–2 | ||
| + | |style="text-align:center"|— | ||
| + | |style="text-align:center"|{{frac|2|63}} | ||
| + | |style="text-align:center"|{{percent|12.1|100}} | ||
| + | |style="text-align:center"|0.190 | ||
| + | |- | ||
| + | |style="text-align:center"|Vanilla | ||
| + | |{{i|Dead Bush|mc=Dead_Bush}} | ||
| + | |style="text-align:center"|— | ||
| + | |style="text-align:center"|1–5 | ||
| + | |style="text-align:center"|— | ||
| + | |style="text-align:center"|{{frac|7|63}} | ||
| + | |style="text-align:center"|{{percent|37.3|100}} | ||
| + | |style="text-align:center"|1.333 | ||
| + | |- | ||
| + | |style="text-align:center"|Vanillga | ||
| + | |{{i|Cobweb}} | ||
| + | |style="text-align:center"|— | ||
| + | |style="text-align:center"|1–5 | ||
| + | |style="text-align:center"|— | ||
| + | |style="text-align:center"|{{frac|7|63}} | ||
| + | |style="text-align:center"|{{percent|37.3|100}} | ||
| + | |style="text-align:center"|1.333 | ||
| + | |- | ||
| + | |style="text-align:center"|Vanilla | ||
| + | |{{i|Poisonous Potato|mc=Poisonous_Potato}} | ||
| + | |style="text-align:center"|— | ||
| + | |style="text-align:center"|1–5 | ||
| + | |style="text-align:center"|— | ||
| + | |style="text-align:center"|{{frac|7|63}} | ||
| + | |style="text-align:center"|{{percent|37.3|100}} | ||
| + | |style="text-align:center"|1.333 | ||
| + | |- | ||
| + | |style="text-align:center"|Vanilla | ||
| + | |{{i|Crimson Fungus|mc=Fungus}} | ||
| + | |style="text-align:center"|— | ||
| + | |style="text-align:center"|1–5 | ||
| + | |style="text-align:center"|— | ||
| + | |style="text-align:center"|{{frac|5|63}} | ||
| + | |style="text-align:center"|{{percent|28|100}} | ||
| + | |style="text-align:center"|0.952 | ||
| + | |- | ||
| + | |style="text-align:center"|Vanilla | ||
| + | |{{i|Warped Fungus|mc=Fungus}} | ||
| + | |style="text-align:center"|— | ||
| + | |style="text-align:center"|1–5 | ||
| + | |style="text-align:center"|— | ||
| + | |style="text-align:center"|{{frac|5|63}} | ||
| + | |style="text-align:center"|{{percent|28|100}} | ||
| + | |style="text-align:center"|0.952 | ||
|} | |} | ||
==Structures== | ==Structures== | ||
| + | ===Towers=== | ||
{|class="mw-collapsible mw-collapsed wikitable" | {|class="mw-collapsible mw-collapsed wikitable" | ||
| − | !style="text-align:center"|Variant | + | !style="text-align:center" colspan="2"|Variant |
| − | !style="text-align:center"| | + | !style="text-align:center"|Info |
!style="text-align:center"|Image | !style="text-align:center"|Image | ||
|- | |- | ||
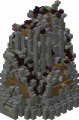
| − | |Variant A | + | |colspan="2"|Variant A |
| − | |<code>pixelmon:hauntedtower/haunted_tower_a</code> | + | |{{tt|ID|Used in Template Pools and when loading a structure with Structure Blocks.}}: <code>pixelmon:hauntedtower/haunted_tower_a</code> |
| + | [[Pokéloot]]: Tier 1, Tier 3 (hidden) | ||
| + | |||
| + | Builder: '''SKy_the_Thunder''' | ||
|[[File:Haunted_Tower_A.png|150px]] | |[[File:Haunted_Tower_A.png|150px]] | ||
|- | |- | ||
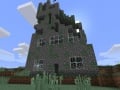
| − | |Variant B | + | |colspan="2"|Variant B |
| − | |<code>pixelmon:hauntedtower/haunted_tower_b</code> | + | |{{tt|ID|Used in Template Pools and when loading a structure with Structure Blocks.}}: <code>pixelmon:hauntedtower/haunted_tower_b</code> |
| + | {{tt|Loot Tables|Determines which items can be found in containers like Chests/Barrels.}}: <code>pixelmon:chests/haunted_home</code>, <code>pixelmon:chests/haunted_tower</code><br> | ||
| + | [[Pokéloot]]: Tier 1, Tier 3 (hidden) | ||
| + | |||
| + | Builder: '''SKy_the_Thunder''' | ||
|[[File:Haunted_Tower_B.png|150px]] | |[[File:Haunted_Tower_B.png|150px]] | ||
|- | |- | ||
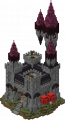
| − | |Variant C | + | |rowspan="2"|Variant C |
| − | |<code>pixelmon:hauntedtower/haunted_tower_c</code> | + | |Castle |
| − | |[[File: | + | |{{tt|ID|Used in Template Pools and when loading a structure with Structure Blocks.}}: <code>pixelmon:hauntedtower/haunted_tower_c</code> |
| + | {{tt|Loot Tables|Determines which items can be found in containers like Chests/Barrels.}}: <code>minecraft:chests/village/village_fletcher</code>, <code>pixelmon:chests/haunted_home</code>, <code>pixelmon:chests/haunted_tower</code> | ||
| + | |||
| + | Builder: '''ZodiacBullYT''' | ||
| + | |[[File:Haunted_Tower_C_base.png|150px]] | ||
| + | |- | ||
| + | |Tower | ||
| + | |{{tt|ID|Used in Template Pools and when loading a structure with Structure Blocks.}}: <code>pixelmon:hauntedtower/haunted_tower_c_tower</code> | ||
| + | {{tt|Loot Tables|Determines which items can be found in containers like Chests/Barrels.}}: <code>pixelmon:chests/haunted_tower</code> | ||
| + | |||
| + | Builder: '''ZodiacBullYT''' | ||
| + | |style="text-align:center"|[[File:Haunted_Tower_C_Tower.png|100px]] | ||
| + | |- | ||
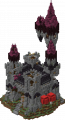
| + | |rowspan="2"|Variant D | ||
| + | |Castle | ||
| + | |{{tt|ID|Used in Template Pools and when loading a structure with Structure Blocks.}}: <code>pixelmon:hauntedtower/haunted_tower_d</code> | ||
| + | {{tt|Loot Tables|Determines which items can be found in containers like Chests/Barrels.}}: <code>minecraft:chests/village/village_fletcher</code>, <code>pixelmon:chests/haunted_home</code>, <code>pixelmon:chests/haunted_tower</code> | ||
| + | |||
| + | Builder: '''ZodiacBullYT''' | ||
| + | |[[File:Haunted_Tower_D_base.png|150px]] | ||
| + | |- | ||
| + | |Tower | ||
| + | |{{tt|ID|Used in Template Pools and when loading a structure with Structure Blocks.}}: <code>pixelmon:hauntedtower/haunted_tower_d_tower</code> | ||
| + | {{tt|Loot Tables|Determines which items can be found in containers like Chests/Barrels.}}: <code>pixelmon:chests/haunted_tower</code> | ||
| + | |||
| + | Builder: '''ZodiacBullYT''' | ||
| + | |style="text-align:center"|[[File:Haunted_Tower_D_Tower.png|100px]] | ||
| + | |} | ||
| + | |||
| + | ===Village=== | ||
| + | <big>With the castle variants</big> | ||
| + | {|class="mw-collapsible mw-collapsed wikitable" | ||
| + | !style="text-align:center" colspan="2"|Name | ||
| + | !style="text-align:center"|Info | ||
| + | !style="text-align:center"|Image | ||
| + | |- | ||
| + | |rowspan="6"|Variant C | ||
| + | |House A | ||
| + | |{{tt|ID|Used in Template Pools and when loading a structure with Structure Blocks.}}: <code>pixelmon:hauntedtower/haunted_tower_c_house_a</code> | ||
| + | {{tt|Loot Tables|Determines which items can be found in containers like Chests/Barrels.}}: <code>pixelmon:chests/haunted_home</code> | ||
| + | |||
| + | Builder: '''ZodiacBullYT''' | ||
| + | |[[File:Haunted_Tower_C_House_A.png|150px]] | ||
| + | |- | ||
| + | |House B | ||
| + | |{{tt|ID|Used in Template Pools and when loading a structure with Structure Blocks.}}: <code>pixelmon:hauntedtower/haunted_tower_c_house_b</code> | ||
| + | {{tt|Loot Tables|Determines which items can be found in containers like Chests/Barrels.}}: <code>pixelmon:chests/haunted_home</code> | ||
| + | |||
| + | Builder: '''ZodiacBullYT''' | ||
| + | |[[File:Haunted_Tower_C_House_B.png|150px]] | ||
| + | |- | ||
| + | |Path A | ||
| + | |{{tt|ID|Used in Template Pools and when loading a structure with Structure Blocks.}}: <code>pixelmon:hauntedtower/haunted_tower_c_path_a</code> | ||
| + | |||
| + | |||
| + | Builder: '''ZodiacBullYT''' | ||
| + | |[[File:Haunted_Tower_C_Path_A.png|150px]] | ||
| + | |- | ||
| + | |Path B | ||
| + | |{{tt|ID|Used in Template Pools and when loading a structure with Structure Blocks.}}: <code>pixelmon:hauntedtower/haunted_tower_c_path_b</code> | ||
| + | |||
| + | |||
| + | Builder: '''ZodiacBullYT''' | ||
| + | |[[File:Haunted_Tower_C_Path_B.png|150px]] | ||
| + | |- | ||
| + | |Path C | ||
| + | |{{tt|ID|Used in Template Pools and when loading a structure with Structure Blocks.}}: <code>pixelmon:hauntedtower/haunted_tower_c_path_c</code> | ||
| + | |||
| + | |||
| + | Builder: '''ZodiacBullYT''' | ||
| + | |[[File:Haunted_Tower_C_Path_C.png|150px]] | ||
| + | |- | ||
| + | |Berry Patch | ||
| + | |{{tt|ID|Used in Template Pools and when loading a structure with Structure Blocks.}}: <code>pixelmon:hauntedtower/haunted_tower_c_berry</code> | ||
| + | |||
| + | |||
| + | Builder: '''ZodiacBullYT''' | ||
| + | |[[File:Haunted_Tower_C_Berry.png|150px]] | ||
| + | |- | ||
| + | |rowspan="6"|Variant D | ||
| + | |House A | ||
| + | |{{tt|ID|Used in Template Pools and when loading a structure with Structure Blocks.}}: <code>pixelmon:hauntedtower/haunted_tower_d_house_a</code> | ||
| + | {{tt|Loot Tables|Determines which items can be found in containers like Chests/Barrels.}}: <code>pixelmon:chests/haunted_home</code> | ||
| + | |||
| + | Builder: '''ZodiacBullYT''' | ||
| + | |[[File:Haunted_Tower_D_House_A.png|150px]] | ||
| + | |- | ||
| + | |House B | ||
| + | |{{tt|ID|Used in Template Pools and when loading a structure with Structure Blocks.}}: <code>pixelmon:hauntedtower/haunted_tower_d_house_b</code> | ||
| + | {{tt|Loot Tables|Determines which items can be found in containers like Chests/Barrels.}}: <code>pixelmon:chests/haunted_home</code> | ||
| + | |||
| + | Builder: '''ZodiacBullYT''' | ||
| + | |[[File:Haunted_Tower_D_House_B.png|150px]] | ||
| + | |- | ||
| + | |Path A | ||
| + | |{{tt|ID|Used in Template Pools and when loading a structure with Structure Blocks.}}: <code>pixelmon:hauntedtower/haunted_tower_d_path_a</code> | ||
| + | |||
| + | |||
| + | Builder: '''ZodiacBullYT''' | ||
| + | |[[File:Haunted_Tower_D_Path_A.png|150px]] | ||
| + | |- | ||
| + | |Path B | ||
| + | |{{tt|ID|Used in Template Pools and when loading a structure with Structure Blocks.}}: <code>pixelmon:hauntedtower/haunted_tower_d_path_b</code> | ||
| + | |||
| + | |||
| + | Builder: '''ZodiacBullYT''' | ||
| + | |[[File:Haunted_Tower_D_Path_B.png|150px]] | ||
|- | |- | ||
| − | | | + | |Path C |
| − | |<code>pixelmon:hauntedtower/ | + | |{{tt|ID|Used in Template Pools and when loading a structure with Structure Blocks.}}: <code>pixelmon:hauntedtower/haunted_tower_d_path_c</code> |
| − | |[[File: | + | |
| + | |||
| + | Builder: '''ZodiacBullYT''' | ||
| + | |[[File:Haunted_Tower_D_Path_C.png|150px]] | ||
| + | |- | ||
| + | |Berry Patch | ||
| + | |{{tt|ID|Used in Template Pools and when loading a structure with Structure Blocks.}}: <code>pixelmon:hauntedtower/haunted_tower_d_berry</code> | ||
| + | |||
| + | |||
| + | Builder: '''ZodiacBullYT''' | ||
| + | |[[File:Haunted_Tower_D_Berry.png|150px]] | ||
|} | |} | ||
Latest revision as of 15:30, 28 May 2024

A Haunted Tower is a Pixelmon structure that spawns in Dark Forest biome.
Contents
Loot
Haunted Tower
Each haunted tower chest contains items drawn from 3 pools (one per category), with the following distribution:
| Category | Item | Stack size | Weight | Chance | Avg. per chest | ||
|---|---|---|---|---|---|---|---|
| 1x | 2-5x | 1x | 2-5x | ||||
| Held Items | 1 | — | 133 | — | 3% | 0.030 | |
| Held Items | 1 | — | 133 | — | 3% | 0.030 | |
| Held Items | 1 | — | 133 | — | 3% | 0.030 | |
| Treasure | 1 | — | 234 | — | 5.9% | 0.059 | |
| Treasure | 1 | — | 134 | — | 2.9% | 0.029 | |
| Treasure | 1 | — | 334 | — | 8.8% | 0.088 | |
| Treasure | 1 | — | 134 | — | 2.9% | 0.029 | |
| Treasure | 1 | — | 334 | — | 8.8% | 0.088 | |
| Treasure | 1 | — | 234 | — | 5.9% | 0.059 | |
| Treasure | 1 | — | 134 | — | 2.9% | 0.029 | |
| Treasure | 1 | — | 334 | — | 8.8% | 0.088 | |
| Treasure | 1 | — | 234 | — | 5.9% | 0.059 | |
| Treasure | 1 | — | 134 | — | 2.9% | 0.029 | |
| Vanilla | — | 1–15 | — | 1063 | 44.4% | 4.444 | |
| Vanilla | — | 1–5 | — | 1063 | 44.4% | 1.667 | |
| Vanilla | — | 1–3 | — | 763 | 33.2% | 0.778 | |
| Vanilla | — | 1–10 | — | 763 | 33.2% | 2.139 | |
| Vanilla | — | 1–5 | — | 763 | 33.2% | 1.167 | |
| Vanilla | — | 1–10 | — | 763 | 33.2% | 2.139 | |
| Vanilla | — | 1–5 | — | 363 | 15.6% | 0.500 | |
| Vanilla | — | 1–2 | — | 563 | 24.8% | 0.417 | |
| Vanilla | — | 0–1 | — | 163 | 5.4% | 0.028 | |
| Vanilla | — | 0–1 | — | 163 | 5.4% | 0.028 | |
| Vanilla | — | 1–2 | — | 563 | 24.8% | 0.417 | |
Haunted Village
Each haunted house chest contains items drawn from 2 pools (one per category), with the following distribution:
| Category | Item | Stack size | Weight | Chance | Avg. per chest | ||
|---|---|---|---|---|---|---|---|
| 1-2x | 3-5x | 1-2x | 3-5x | ||||
| Gems | 1–3 | — | 525 | — | 28% | 0.600 | |
| Gems | 1–3 | — | 525 | — | 28% | 0.600 | |
| Vanilla | — | 1–5 | — | 1063 | 49.4% | 1.905 | |
| Vanilla | — | 1–5 | — | 1063 | 49.4% | 1.905 | |
| Vanilla | — | 1–5 | — | 1063 | 49.4% | 1.905 | |
| Vanilla | — | 1–2 | — | 263 | 12.1% | 0.190 | |
| Vanilla | — | 1–5 | — | 763 | 37.3% | 1.333 | |
| Vanillga | — | 1–5 | — | 763 | 37.3% | 1.333 | |
| Vanilla | — | 1–5 | — | 763 | 37.3% | 1.333 | |
| Vanilla | — | 1–5 | — | 563 | 28% | 0.952 | |
| Vanilla | — | 1–5 | — | 563 | 28% | 0.952 | |
Structures
Towers
| Variant | Info | Image | |
|---|---|---|---|
| Variant A | ID: pixelmon:hauntedtower/haunted_tower_a
Pokéloot: Tier 1, Tier 3 (hidden) Builder: SKy_the_Thunder |

| |
| Variant B | ID: pixelmon:hauntedtower/haunted_tower_b
Loot Tables: Builder: SKy_the_Thunder |

| |
| Variant C | Castle | ID: pixelmon:hauntedtower/haunted_tower_c
Loot Tables: Builder: ZodiacBullYT |

|
| Tower | ID: pixelmon:hauntedtower/haunted_tower_c_tower
Loot Tables: Builder: ZodiacBullYT |

| |
| Variant D | Castle | ID: pixelmon:hauntedtower/haunted_tower_d
Loot Tables: Builder: ZodiacBullYT |

|
| Tower | ID: pixelmon:hauntedtower/haunted_tower_d_tower
Loot Tables: Builder: ZodiacBullYT |

| |
Village
With the castle variants
| Name | Info | Image | |
|---|---|---|---|
| Variant C | House A | ID: pixelmon:hauntedtower/haunted_tower_c_house_a
Loot Tables: Builder: ZodiacBullYT |

|
| House B | ID: pixelmon:hauntedtower/haunted_tower_c_house_b
Loot Tables: Builder: ZodiacBullYT |

| |
| Path A | ID: pixelmon:hauntedtower/haunted_tower_c_path_a
|

| |
| Path B | ID: pixelmon:hauntedtower/haunted_tower_c_path_b
|

| |
| Path C | ID: pixelmon:hauntedtower/haunted_tower_c_path_c
|

| |
| Berry Patch | ID: pixelmon:hauntedtower/haunted_tower_c_berry
|

| |
| Variant D | House A | ID: pixelmon:hauntedtower/haunted_tower_d_house_a
Loot Tables: Builder: ZodiacBullYT |

|
| House B | ID: pixelmon:hauntedtower/haunted_tower_d_house_b
Loot Tables: Builder: ZodiacBullYT |

| |
| Path A | ID: pixelmon:hauntedtower/haunted_tower_d_path_a
|

| |
| Path B | ID: pixelmon:hauntedtower/haunted_tower_d_path_b
|

| |
| Path C | ID: pixelmon:hauntedtower/haunted_tower_d_path_c
|

| |
| Berry Patch | ID: pixelmon:hauntedtower/haunted_tower_d_berry
|

| |
Gallery
Variant A

Variant B
Variant C
Variant D

Trivia
Up to version 8.4.2, Haunted Tower was a structure that spawns in Birch Forest, Forest, Roofed Forest, and Swampland biomes. It contains several Pixelmon spawners that spawn aggressive Ghost-type Pokémon, with higher floors spawning stronger Pokémon. The roof of the tower contains a hidden Master chest and a Pixelmon spawner that only spawns boss Pokémon. However, this particular spawner activates relatively infrequently.
Haunted Tower up to version 8.4.2
