
 NodeCraft
Difference between revisions of "Pixelmon launcher"
(Removed page from translation) |
|||
| (51 intermediate revisions by 7 users not shown) | |||
| Line 1: | Line 1: | ||
| − | + | {{Legacy}} | |
| − | |||
| − | |||
| − | The Pixelmon launcher is currently only compatible with Windows systems. It will not function on | + | The Pixelmon launcher is an optional alternative ''Minecraft'' launcher that can be used to install and run [[Pixelmon]]. It is custom-made specifically for using Pixelmon with ''Minecraft'', and has several features to simplify the installation and configuration of Pixelmon and its [[sidemods]]. |
| + | |||
| + | The launcher provides support for the installation of Pixelmon sidemods that complement Pixelmon. Additional mods other than Pixelmon sidemods can be installed manually or through the use of custom modpacks known as "[[Pixpacks]]"; several sample Pixpacks are available directly from the Pixelmon launcher. The Pixelmon launcher can also use "patches" to update Pixelmon when new Pixelmon versions are released; these patches are smaller downloads compared to downloading the entire Pixelmon jar file to update to a new version. | ||
| + | |||
| + | The Pixelmon launcher is currently only compatible with Windows systems. It will not function on macOS or Linux; on these operating systems, the regular ''Minecraft'' launcher can still be used to [[install]] and use Pixelmon. | ||
==Installation and Setup== | ==Installation and Setup== | ||
| − | #Download the Pixelmon launcher | + | __TOC__ |
| − | + | #Download the Pixelmon launcher [https://pixelmonmod.com/downloads.php here]. | |
| − | #Once the download is completed, run the downloaded | + | #Once the download is completed, run the downloaded executable file to install the Pixelmon launcher. |
| − | # | + | #Accept the terms and conditions and specify where the Pixelmon launcher should be installed. |
| + | #When the installation finishes, the Pixelmon launcher will start automatically. A shortcut will be placed on the desktop for future use. | ||
#Enter in your ''Minecraft'' account details to log into your account. | #Enter in your ''Minecraft'' account details to log into your account. | ||
| + | #*To complete this step, you need to own a purchased copy of the computer version of ''Minecraft''. You cannot use the Pixelmon launcher if you use a cracked version of ''Minecraft'', or if you only own ''Minecraft'' Pocket Edition (including Windows 10 Edition) or console editions (Xbox, PlayStation, Wii U). | ||
#If you are using the launcher to run a Pixpack, click [[Pixelmon launcher#Running a Pixpack|here]]. Otherwise, continue below. | #If you are using the launcher to run a Pixpack, click [[Pixelmon launcher#Running a Pixpack|here]]. Otherwise, continue below. | ||
#Click the "Create New Profile" button in the green box. This will cause the profile editor interface to appear. | #Click the "Create New Profile" button in the green box. This will cause the profile editor interface to appear. | ||
| − | # | + | #Choose the desired Pixelmon and Forge versions |
#Name the new profile if desired. | #Name the new profile if desired. | ||
| − | #If you want to use any additional mods alongside Pixelmon, | + | #If you want to use any additional mods alongside Pixelmon, click the "Add Official Sidemods" button for Pixelmon [[sidemods]] and/or the "Browse for Mods" button for other mods on your system. |
#Save your profile once you are finished creating it. | #Save your profile once you are finished creating it. | ||
| − | #Click the download icon in the top-right area of the launcher to install ''Minecraft'' and Forge into the Pixelmon launcher. This may take a few minutes. | + | #Click the download icon in the top-right area of the launcher to install ''Minecraft'', Pixelmon, and Forge into the Pixelmon launcher. This may take a few minutes. |
#Once the downloading is finished, the download icon will be replaced with a play icon. Pressing this button will launch ''Minecraft''. | #Once the downloading is finished, the download icon will be replaced with a play icon. Pressing this button will launch ''Minecraft''. | ||
<gallery> | <gallery> | ||
| Line 22: | Line 26: | ||
LauncherProfileEdit.png|Editing an existing profile | LauncherProfileEdit.png|Editing an existing profile | ||
</gallery> | </gallery> | ||
| − | == | + | ===Troubleshooting=== |
| − | + | *If the Pixelmon launcher crashes during the installation process, see [[Crash Reading 101/Pixelmon launcher]] for possible solutions. If you cannot find a solution on that page, post a support ticket on the [https://www.pixelmonmod.com/tracker.php?p=4 Pixelmon forums]. | |
| − | + | *If you are unable to launch ''Minecraft'' because you cannot allocate enough memory to Pixelmon, see [[Fixing memory issues#32-bit Java|Fixing memory issues]]. | |
| − | + | ==Settings== | |
| − | + | ===Profile settings=== | |
| − | + | [[File:LauncherProfileSettings.png|thumb|The profile settings window]] | |
| − | + | These settings can be found in the profile editor screen. | |
| − | + | *Use custom window size: This allows a window size (width and height) to be defined exactly; it is an alternative to dragging the lower-right corner to resize the window. | |
| − | + | *Additional arguments to use when initializing ''Minecraft''. | |
| − | If a | + | *Keep output dialog open after ''Minecraft'' exits: This specifies whether the ''Minecraft'' console will persist after ''Minecraft'' closes. |
| − | + | *Reinstall all libraries next install: This will force all files to be re-downloaded the next time the profile is used. | |
| − | + | ||
| − | + | ===''Minecraft'' settings=== | |
| − | + | [[File:LauncherMinecraftSettings.png|thumb|The ''Minecraft'' settings window]] | |
| − | + | These settings can be found by selecting the gear button in the top-right corner of the main menu. | |
| − | + | *Volume: The volume of the music playing in the Pixelmon launcher. | |
| − | + | *Maximum memory: The maximum amount of memory that can be allocated to ''Minecraft'' when it is running. | |
| − | + | *Select Java Install: This specifies which version of Java to use when running ''Minecraft''. | |
| − | + | *Change Storage Location: Allows the location of Pixelmon launcher data storage files to be changed. | |
| − | + | *Java arguments: The JVM arguments to use when running ''Minecraft''. | |
| − | + | *Auto-updater: This feature will check if there is a Pixelmon launcher update periodically (can be configured or disabled) and automatically update the Pixelmon launcher if there is one. | |
| − | + | *Enable advanced features: This enables certain features that should only be used by players with knowledge of the subject matter, such as JVM arguments. | |
| − | |||
| − | |||
| − | |||
| − | |||
| − | |||
| − | |||
| − | |||
| − | |||
| − | |||
| − | |||
| − | |||
| − | |||
| − | |||
| − | |||
| − | |||
| − | |||
| − | |||
| − | |||
| − | |||
| − | |||
| − | |||
| − | [[File: | ||
| − | |||
| − | * | ||
| − | |||
| − | |||
| − | * | ||
| − | |||
| − | * | ||
| − | * | ||
| − | * | ||
| − | |||
| − | |||
| − | |||
| − | |||
| − | |||
| − | |||
| − | |||
| − | |||
| − | |||
| − | |||
| − | |||
| − | |||
| − | |||
| − | |||
| − | |||
| − | |||
| − | |||
| − | |||
| − | |||
| − | |||
| − | |||
| − | === | + | ===Other settings=== |
| − | + | *Language can be changed by clicking the flag button in the top-right corner of the launcher. | |
| − | + | ==Version history== | |
| − | + | [[Version history/Pixelmon launcher]] | |
| − | |||
| − | |||
| − | |||
| − | |||
Latest revision as of 13:36, 15 June 2022
The Pixelmon launcher is an optional alternative Minecraft launcher that can be used to install and run Pixelmon. It is custom-made specifically for using Pixelmon with Minecraft, and has several features to simplify the installation and configuration of Pixelmon and its sidemods.
The launcher provides support for the installation of Pixelmon sidemods that complement Pixelmon. Additional mods other than Pixelmon sidemods can be installed manually or through the use of custom modpacks known as "Pixpacks"; several sample Pixpacks are available directly from the Pixelmon launcher. The Pixelmon launcher can also use "patches" to update Pixelmon when new Pixelmon versions are released; these patches are smaller downloads compared to downloading the entire Pixelmon jar file to update to a new version.
The Pixelmon launcher is currently only compatible with Windows systems. It will not function on macOS or Linux; on these operating systems, the regular Minecraft launcher can still be used to install and use Pixelmon.
Installation and Setup
Contents
- Download the Pixelmon launcher here.
- Once the download is completed, run the downloaded executable file to install the Pixelmon launcher.
- Accept the terms and conditions and specify where the Pixelmon launcher should be installed.
- When the installation finishes, the Pixelmon launcher will start automatically. A shortcut will be placed on the desktop for future use.
- Enter in your Minecraft account details to log into your account.
- To complete this step, you need to own a purchased copy of the computer version of Minecraft. You cannot use the Pixelmon launcher if you use a cracked version of Minecraft, or if you only own Minecraft Pocket Edition (including Windows 10 Edition) or console editions (Xbox, PlayStation, Wii U).
- If you are using the launcher to run a Pixpack, click here. Otherwise, continue below.
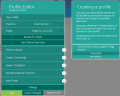
- Click the "Create New Profile" button in the green box. This will cause the profile editor interface to appear.
- Choose the desired Pixelmon and Forge versions
- Name the new profile if desired.
- If you want to use any additional mods alongside Pixelmon, click the "Add Official Sidemods" button for Pixelmon sidemods and/or the "Browse for Mods" button for other mods on your system.
- Save your profile once you are finished creating it.
- Click the download icon in the top-right area of the launcher to install Minecraft, Pixelmon, and Forge into the Pixelmon launcher. This may take a few minutes.
- Once the downloading is finished, the download icon will be replaced with a play icon. Pressing this button will launch Minecraft.
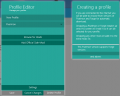
Making a new profile
Editing an existing profile


Troubleshooting
- If the Pixelmon launcher crashes during the installation process, see Crash Reading 101/Pixelmon launcher for possible solutions. If you cannot find a solution on that page, post a support ticket on the Pixelmon forums.
- If you are unable to launch Minecraft because you cannot allocate enough memory to Pixelmon, see Fixing memory issues.
Settings
Profile settings

These settings can be found in the profile editor screen.
- Use custom window size: This allows a window size (width and height) to be defined exactly; it is an alternative to dragging the lower-right corner to resize the window.
- Additional arguments to use when initializing Minecraft.
- Keep output dialog open after Minecraft exits: This specifies whether the Minecraft console will persist after Minecraft closes.
- Reinstall all libraries next install: This will force all files to be re-downloaded the next time the profile is used.
Minecraft settings

These settings can be found by selecting the gear button in the top-right corner of the main menu.
- Volume: The volume of the music playing in the Pixelmon launcher.
- Maximum memory: The maximum amount of memory that can be allocated to Minecraft when it is running.
- Select Java Install: This specifies which version of Java to use when running Minecraft.
- Change Storage Location: Allows the location of Pixelmon launcher data storage files to be changed.
- Java arguments: The JVM arguments to use when running Minecraft.
- Auto-updater: This feature will check if there is a Pixelmon launcher update periodically (can be configured or disabled) and automatically update the Pixelmon launcher if there is one.
- Enable advanced features: This enables certain features that should only be used by players with knowledge of the subject matter, such as JVM arguments.
Other settings
- Language can be changed by clicking the flag button in the top-right corner of the launcher.